Category: Linux
Magnet Weekly CTF – Week 8
The Magnet Forensics Weekly CTF has been running since October and sets one question each week using an image that changes each month. The October questions were based on an Android filesystem dump. November’s image is Linux, more specifically a Hadoop cluster comprising of three E01 files. The images were created by Ali Hadi as part of his OSDFCon 2019 Linux Forensics workshop; the November CTF questions are based on Case 2, which can be downloaded here.
This was another two-part challenge; identify what was installed following a compromise, then determine why. You can find my other Magnet Weekly CTF write-ups here.
Part 1
What package(s) were installed by the threat actor? Select the most correct answer!
The question as written doesn’t mention which of the images are in scope, but the on the video announcement for the question Ali Hadi specified the question refers to the primary node (HDFS-Master.E01). As usual I started by mounting the mounting the image using ewfmount.
# ewfmount /mnt/hgfs/Shared/mwctf/linux/HDFS-Master.E01 /mnt/ewf
# losetup --read-only --offset $((2048*512)) /dev/loop20 /mnt/ewf/ewf1
# mount -o ro,noload,noexec /dev/loop20 /mnt/ewf_mount/

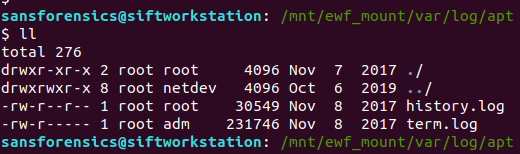
Initially I thought the “threat actor” referenced in the question was another bit of wordplay that I have completely missed so often over the last questions; “threat actor” to “Advanced Persistent Threat” to the “apt” package manager. I suspect I’m seeing connections that weren’t intended, but the apt/history log is where I found the answer to Part 1.
Assuming that the most recent entries in the log would point toward the threat actor, I used the tail command.
tail /mnt/ewf_mount/var/log/apt/history.log

Using the default options tail shows the two most recent apt executions from the log: the first looks like a Linux kernel upgrade, and the second installed php and the associated packages for PHP 7.0
I found the “select the most correct answer” comment to be a bit vague but my first answer of php was accepted.
One interesting point from the log: note the length of time between apt recording any package management activity.
Start-Date: 2017-11-08 06:12:58
Commandline: /usr/bin/unattended-upgrade

Start-Date: 2019-10-07 01:30:31
Commandline: apt install php
Almost two years between the commands! Timezones are hard, but it’s probably a safe assumption that the host was compromised around the 7th of October 2019.
Flag (Part 1)
php
Part 2
Why? (two attempts)
- hosting a database
- serving a webpage
- to run a php webshell
- create a fake systemd service
Part 2 simply asks why? Four options are provided, but with only two attempts available we need to do some analysis rather than just guessing. That being said though, the first two options seemed unlikely post-compromise activities, so I began by investigating the systemd services.
The systemd service descriptions are stored in the /etc/systemd/system directory:
ll /mnt/ewf_mount/etc/systemd/system/
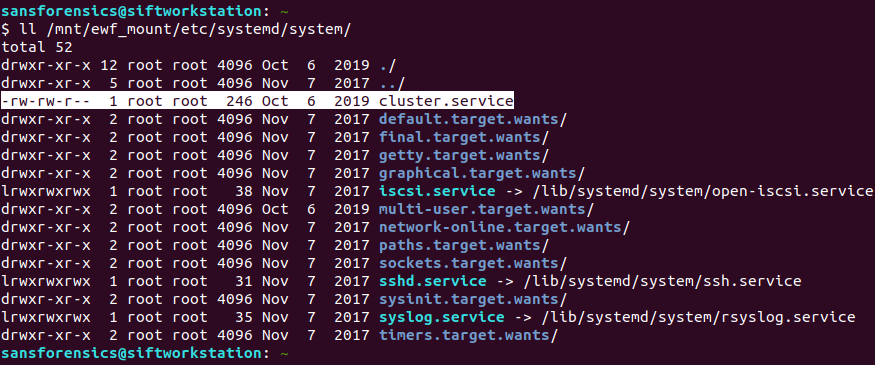
Based on the timestamp alone the cluster.service file stands out. But the 6th of October 2019 is earlier than the PHP installation we found in Part 1. Let’s get the inode number and check with istat:
ll -i /mnt/ewf_mount/etc/systemd/system/cluster.service
sudo istat -o 2048 /mnt/ewf/ewf1 2229804

File Created: 2019-10-06 22:28:16.492115650 (UTC)
That’s better. My SIFT VM is configured to use UTC locally. It seems that the timestamps written into the log entries will need to be manually adjusted. Timezones are still hard.

Now, let’s look at the service description file itself.
cat /mnt/ewf_mount/etc/systemd/system/cluster.service

That’s interesting! The service starts as the root user (suggesting some privilege escalation) and executes a PHP file. Let’s check that out.
cat /mnt/ewf_mount/usr/local/hadoop/bin/cluster.php

There’s our PHP shell! Binding to port 17001 and executing commands using the shell_exec function.
This is another point that I found the question to be a little unclear. We do have a fake systemd service, but that service calls a PHP shell. It seems that the threat actor had elevated privileges to allow the service creation regardless of whether PHP was installed, so PHP is only really necessary to run the PHP shell. Unfortunately, that answer was incorrect. I guess our PHP shell is just a bind shell rather than specifically a webshell, but nevermind.
We have one attempt left, and we definitely have a fake systemd service, so no harm done.
Flag (Part 2)
create a fake systemd service
That wraps up the Linux analysis challenges! December will focus on Windows memory analysis – specifically the memory image from the 2020 Magnet Virtual Summit CTF which I wrote-up back in June.
Magnet Weekly CTF – Week 7 – Domains and Such
The Magnet Forensics Weekly CTF has been running since October and sets one question each week using an image that changes each month. The October questions were based on an Android filesystem dump. November’s image is Linux, more specifically a Hadoop cluster comprising of three E01 files. The images were created by Ali Hadi as part of his OSDFCon 2019 Linux Forensics workshop; the November CTF questions are based on Case 2, which can be downloaded here.
This week was another multi-part challenge – three questions related to the network configuration of the primary node. You can find my other Magnet Weekly CTF write-ups here.
Part 1 (15 points)
What is the IP address of the HDFS primary node?
We start, as usual, by mounting the E01 image for the primary node (HDFS-Master.E01). Based on the Week 5 challenge we know that the sector offset for the beginning of the primary partition is 2048, and the sector size is 512 bytes.
# ewfmount /mnt/hgfs/Shared/mwctf/linux/HDFS-Master.E01 /mnt/ewf
# losetup --read-only --offset $((2048*512)) /dev/loop20 /mnt/ewf/ewf1
# mount -o ro,noload,noexec /dev/loop20 /mnt/ewf_mount/

Compared to the previous Linux challenges this one is pretty straightforward. The location that immediately comes to mind when dealing with network configuration is the interfaces file.
cat /mnt/ewf_mount/etc/network/interfaces
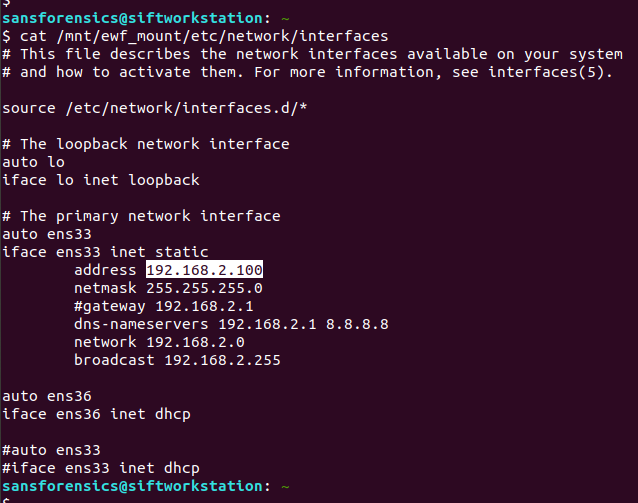
This file is used to configure the network interfaces available on the host, and contains all the information we need to complete this week’s challenge.
First, the IP address is listed as 192.168.2.100
Flag (Part 1)
192.168.2.100
Part 2 (5 points)
Is the IP address on HDFS-Primary dynamically or statically assigned?

The interface is statically assigned, rather than using DHCP.
Flag (Part 2)
statically
Part 3 (5 points)
What is the interface name for the primary HDFS node? (2 attempts)
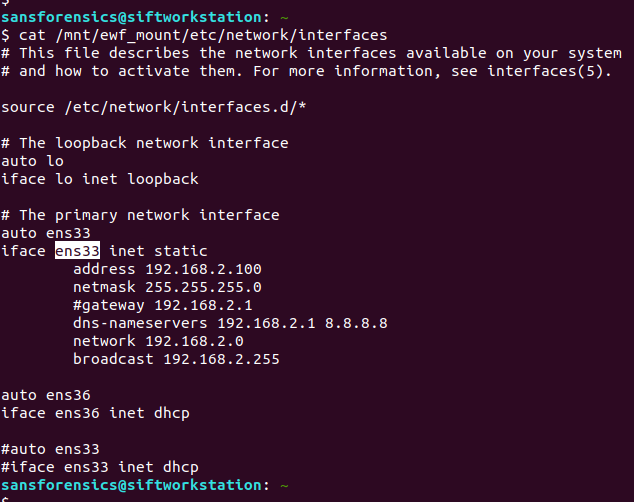
The host has two network interfaces configured. Given that the first two parts have referred to the statically configured one, ens33 is a safe bet.
Flag (Part 3)
ens33
Digging into DHCP
That completes the Week 7 challenge but I started thinking about the DHCP configuration of the other interface, and where I might find more details. After some searching I found the following files, one for each interface:
/var/lib/dhcp/dhclient.enp0s3.leases
/var/lib/dhcp/dhclient.ens36.leases
These files contain the DHCP lease details for each interface, and while they were not relevant in this challenge, might be a good source for future investigations.
sansforensics@siftworkstation: ~
$ cat /mnt/ewf_mount/var/lib/dhcp/dhclient.enp0s3.leases
lease {
interface "enp0s3";
fixed-address 192.168.2.100;
option subnet-mask 255.255.255.0;
option routers 192.168.2.222;
option dhcp-lease-time 86400;
option dhcp-message-type 5;
option domain-name-servers 192.168.2.222,192.168.88.1;
option dhcp-server-identifier 192.168.2.222;
option broadcast-address 192.168.2.255;
option domain-name "w1re";
renew 4 2017/11/09 00:14:43;
rebind 4 2017/11/09 00:14:43;
expire 4 2017/11/09 00:14:43;
}
sansforensics@siftworkstation: ~
$
sansforensics@siftworkstation: ~
$ cat /mnt/ewf_mount/var/lib/dhcp/dhclient.ens36.leases
lease {
interface "ens36";
fixed-address 172.16.64.137;
option subnet-mask 255.255.255.0;
option routers 172.16.64.2;
option dhcp-lease-time 1800;
option dhcp-message-type 5;
option domain-name-servers 172.16.64.2;
option dhcp-server-identifier 172.16.64.254;
option broadcast-address 172.16.64.255;
option netbios-name-servers 172.16.64.2;
option domain-name "localdomain";
renew 0 2019/10/06 21:20:30;
rebind 0 2019/10/06 21:20:30;
expire 0 2019/10/06 21:20:30;
}
lease {
interface "ens36";
fixed-address 172.16.64.137;
option subnet-mask 255.255.255.0;
option routers 172.16.64.2;
option dhcp-lease-time 1800;
option dhcp-message-type 5;
option domain-name-servers 172.16.64.2;
option dhcp-server-identifier 172.16.64.254;
option broadcast-address 172.16.64.255;
option netbios-name-servers 172.16.64.2;
option domain-name "localdomain";
renew 0 2019/10/06 21:35:23;
rebind 0 2019/10/06 21:49:23;
expire 0 2019/10/06 21:53:08;
}
lease {
interface "ens36";
fixed-address 172.16.64.137;
option subnet-mask 255.255.255.0;
option routers 172.16.64.2;
option dhcp-lease-time 1800;
option dhcp-message-type 5;
option domain-name-servers 172.16.64.2;
option dhcp-server-identifier 172.16.64.254;
option broadcast-address 172.16.64.255;
option netbios-name-servers 172.16.64.2;
option domain-name "localdomain";
renew 0 2019/10/06 21:48:26;
rebind 0 2019/10/06 22:01:38;
expire 0 2019/10/06 22:05:23;
}
lease {
interface "ens36";
fixed-address 172.16.64.137;
option subnet-mask 255.255.255.0;
option routers 172.16.64.2;
option dhcp-lease-time 1800;
option dhcp-message-type 5;
option domain-name-servers 172.16.64.2;
option dhcp-server-identifier 172.16.64.254;
option broadcast-address 172.16.64.255;
option netbios-name-servers 172.16.64.2;
option domain-name "localdomain";
renew 0 2019/10/06 22:02:30;
rebind 0 2019/10/06 22:14:41;
expire 0 2019/10/06 22:18:26;
}
lease {
interface "ens36";
fixed-address 172.16.64.137;
option subnet-mask 255.255.255.0;
option routers 172.16.64.2;
option dhcp-lease-time 1800;
option dhcp-message-type 5;
option domain-name-servers 172.16.64.2;
option dhcp-server-identifier 172.16.64.254;
option broadcast-address 172.16.64.255;
option netbios-name-servers 172.16.64.2;
option domain-name "localdomain";
renew 0 2019/10/06 22:16:55;
rebind 0 2019/10/06 22:28:45;
expire 0 2019/10/06 22:32:30;
}
lease {
interface "ens36";
fixed-address 172.16.64.137;
option subnet-mask 255.255.255.0;
option routers 172.16.64.2;
option dhcp-lease-time 1800;
option dhcp-message-type 5;
option domain-name-servers 172.16.64.2;
option dhcp-server-identifier 172.16.64.254;
option broadcast-address 172.16.64.255;
option netbios-name-servers 172.16.64.2;
option domain-name "localdomain";
renew 0 2019/10/06 22:31:54;
rebind 0 2019/10/06 22:43:10;
expire 0 2019/10/06 22:46:55;
}
lease {
interface "ens36";
fixed-address 172.16.64.137;
option subnet-mask 255.255.255.0;
option routers 172.16.64.2;
option dhcp-lease-time 1800;
option dhcp-message-type 5;
option domain-name-servers 172.16.64.2;
option dhcp-server-identifier 172.16.64.254;
option broadcast-address 172.16.64.255;
option netbios-name-servers 172.16.64.2;
option domain-name "localdomain";
renew 0 2019/10/06 22:45:49;
rebind 0 2019/10/06 22:58:09;
expire 0 2019/10/06 23:01:54;
}
lease {
interface "ens36";
fixed-address 172.16.64.137;
option subnet-mask 255.255.255.0;
option routers 172.16.64.2;
option dhcp-lease-time 1800;
option dhcp-message-type 5;
option domain-name-servers 172.16.64.2;
option dhcp-server-identifier 172.16.64.254;
option broadcast-address 172.16.64.255;
option netbios-name-servers 172.16.64.2;
option domain-name "localdomain";
renew 0 2019/10/06 22:59:47;
rebind 0 2019/10/06 23:12:04;
expire 0 2019/10/06 23:15:49;
}
sansforensics@siftworkstation: ~
$
Magnet Weekly CTF – Week 6 – The Elephant in the Room
The Magnet Forensics Weekly CTF has been running since October and sets one question each week using an image that changes each month. The October questions were based on an Android filesystem dump. November’s image is Linux, more specifically a Hadoop cluster comprising of three E01 files. The images were created by Ali Hadi as part of his OSDFCon 2019 Linux Forensics workshop; the November CTF questions are based on Case 2, which can be downloaded here.
This week is a little different and split into two parts, with the second part revealed once the first has been successfully answered. You can find my other Magnet Weekly CTF write-ups here.
Part 1 (25 points)
Hadoop is a complex framework from Apache used to perform distributed processing of large data sets. Like most frameworks, it relies on many dependencies to run smoothly. Fortunately, it’s designed to install all of these dependencies automatically. On the secondary nodes (not the MAIN node) your colleague recollects seeing one particular dependency failed to install correctly. Your task is to find the specific error code that led to this failed dependency installation. [Flag is numeric]
We have three E01 images making up the Hadoop cluster – Master, Slave1, Slave2 – and this time we are looking at either Slave1 or Slave2. I started with Slave1, and mounted the E01 file in the same way as in the Week 5 challenge. From a root shell:
# ewfmount /mnt/hgfs/Shared/mwctf/linux/HDFS-Slave1.E01 /mnt/ewf
# mmls /mnt/ewf/ewf1
# losetup --read-only --offset $((2048*512)) /dev/loop20 /mnt/ewf/ewf1
# mount -o ro,noload,noexec /dev/loop20 /mnt/ewf_mount/

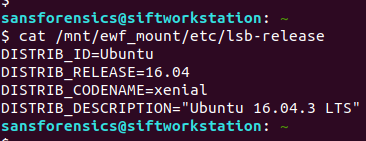
Now we have the main ext4 partition mounted we can get on with the analysis. We are looking for logs relating to package management; checking the release information the underlying system is Ubuntu 16.04 so the APT package manager seems a reasonable place to start looking.
cat /mnt/ewf_mount/etc/lsb-release
APT keeps two logs under the /var/log/apt directory:
/var/log/apt/history.log
/var/log/apt/term.log
Checking history.log first, I found that the oracle-java7-installer, oracle-java8-installer, and oracle-java9-installer packages all failed to install correctly. Hadoop requires Java to function, so this is looking good.
less /mnt/ewf_mount/var/log/apt/history.log

The history.log file shows that the dpkg sub-process failed with error code 1; unfortunately this isn’t the answer we are looking for, so let’s try term.log instead.
We can quickly filter the errors using grep, with the -C 5 argument to provide some context around the matches.
cat /mnt/ewf_mount/var/log/apt/term.log | grep -C 5 "ERROR"

Examining the grep output from term.log, we find that the oracle-java7-installer package failed to download, resulting in the dpkg error we saw in history.log, but now we see the HTTP 404 error code indicating that the package file was not found. Submit this error code, and we have completed Part 1!
Flag (Part 1)
404
Part 2 (50 points)
Don’t panic about the failed dependency installation. A very closely related dependency was installed successfully at some point, which should do the trick. Where did it land? In that folder, compared to its binary neighbors nearby, this particular file seems rather an ELFant. Using the error code from your first task, search for symbols beginning with the same number (HINT: leading 0’s don’t count). There are three in particular whose name share a common word between them. What is the word?
The question is a bit of a riddle, but given that the oracle-java packages failed to install, and we know from Week 5 that the Java JDK was installed to /usr/local/jdk1.8.0_151 so there’s a starting point. The question also references binary files and ELF, which is a standard binary format on Linux systems, so my guess is that we need to examine the symbol table within the ELF binaries.
The Java binaries are contained in the /usr/local/jdk1.8.0_151/bin directory.
ll /mnt/ewf_mount/usr/local/jdk1.8.0_151/bin/

We can check the file types using the file command, and filter the ELF executables using grep:
file /mnt/ewf_mount/usr/local/jdk1.8.0_151/bin/* | grep "ELF"
file /mnt/ewf_mount/usr/local/jdk1.8.0_151/bin/* | grep "ELF" | wc -l

According to the file output there are 42 binaries; we can dump the symbol tables using the readelf utility, but which executable are we looking for? Rather than checking each file individually, I dumped the symbol table from all of the binaries (sending the error messages to /dev/null) and used grep to filter out “404“.
readelf --symbols /mnt/ewf_mount/usr/local/jdk1.8.0_151/bin/* 2>/dev/null | grep 404

We are looking for a common word, shared between three symbols. One jumps out – deflate.
The answer was accepted but for completeness sake, let’s find out which executable the question referred to.
readelf --symbols /mnt/ewf_mount/usr/local/jdk1.8.0_151/bin/* 2>/dev/null | grep -E "File: |404" | grep -B 1 "deflate"

Employing a bit of grep-fu to tidy things up, we can see that the executable in question is:
/mnt/ewf_mount/usr/local/jdk1.8.0_151/bin/unpack200
Flag (Part 2)
deflate
Magnet Weekly CTF – Week 5 – Had-A-Loop Around the Block
The Magnet Forensics Weekly CTF has been running since October and sets one question each week using an image that changes each month. The October questions were based on an Android filesystem dump. November’s image is Linux, more specifically a Hadoop cluster comprising of three E01 files. The images were created by Ali Hadi as part of his OSDFCon 2019 Linux Forensics workshop; the November CTF questions are based on Case 2, which can be downloaded here.
You can find my other Magnet Weekly CTF write-ups here.
Had-A-Loop Around the Block (75 points)
What is the original filename for block 1073741825?
New month, new image. I’ve done some Linux forensics before but never anything involving Hadoop. And this question is worth 75 points. Week 3 was only worth 40 so this gives an indication that it’s going to be a long one!
The Case 2 image set is comprised of three hosts:
- HDFS-Master
- HDFS-Slave1
- HDFS-Slave2
I started with HDFS-Master.E01 just because it seemed like a sensible place to begin. The first thing to do is mount the disk image and see what we have.
Part 1 – Mounting E01 files using SIFT Workstation
Most Linux forensics tools are happiest when they are working with raw disk images. The fact we have Expert Witness Format (E01) files complicates things a little, but not too much.
I like to use free or open-source tools as far as possible for CTFs so we are going to mount the image as a loopback device using ewfmount and tools from The Sleuthkit – all available in the SANS SIFT virtual machine.
One of the advantages of E01 files is that they can also contain case metadata. We can view this metadata using the ewfinfo tool.
ewfinfo /mnt/hgfs/Shared/mwctf/linux/HDFS-Master.E01

Before we create the loopback device we need to get our E01 file into something resembling a raw disk image. We could convert the E01 to raw using ewfexport but that takes time and expands our image to the full 80GB disk. Instead, we will use ewfmount to create something the standard Linux tools can work with.
sudo ewfmount /mnt/hgfs/Shared/mwctf/linux/HDFS-Master.E01 /mnt/ewf

efwmount creates a read-only, virtual raw disk image located at /mnt/ewf/ewf1. The next thing to do is check on the geometry of the disk. I used mmls from The Sleuthkit to dump the partition table; we’ll need this data for the next step.
(From here on I had to sudo to a root shell due to the permissions that ewfmount left me with)
sudo -s
# mmls /mnt/ewf/ewf1
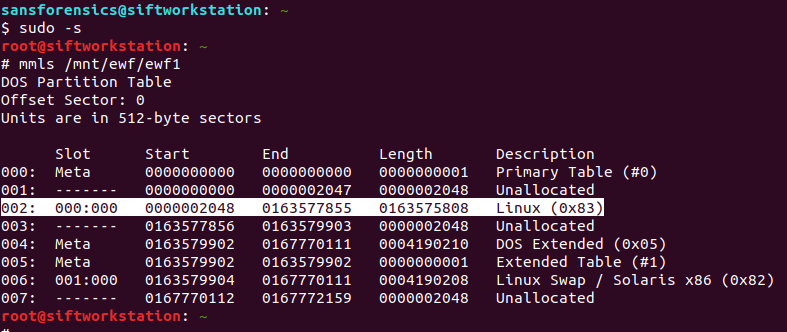
Partition 002 is the one we are interested in. Its description tells us it is Linux ext2/3/4 and the length means it is the largest single partition on the disk. The part we need to take note of for now is the Start sector offset: 2048. We will use this later to mount the partition. First though, let’s get some more information about the filesystem on the partition.
# fsstat -o 2048 /mnt/ewf/ewf1 | tee /home/sansforensics/mwctf/fsstat-2048.out
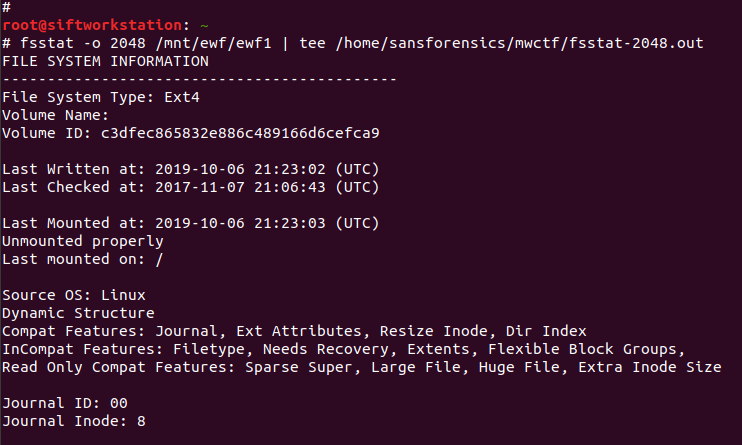
The fsstat command gives us a lot of information that might be useful later on, so I used tee to save the output to a file. The output confirms that we are dealing with an ext4 filesystem which, helpfully, was unmounted correctly! Now, we can move on and create the loopback device which will then allow us to mount the filesystem.
# losetup --read-only --offset $((2048*512)) /dev/loop20 /mnt/ewf/ewf1
# file -s /dev/loop20

This step gave me a lot of problems relating to the loop device being “unavailable”; losetup should be smart enough to use the next available device without prompting, but eventually I found that if I set the device myself (/dev/loop20, in my case) the command succeeded. The other aspects to note are that I created the loopback device as read-only – ewfmount already created a read-only device for us, but practice safe mounting – and that the offset value is the sector offset from mmls (2048) multiplied by the sector size in bytes (512).
Now we can move on to the final stage of preparation and actually mount the filesystem.
# mount -o ro,noload,noexec /dev/loop20 /mnt/ewf_mount/

I also ran into a problem with my initial attempt to mount the filesystem. I suspect this was because the journal was in need of recovery (as per the file -s output above). Adding the noload option tells the filesystem driver to ignore the journal errors, and allows us mount the filesystem successfully! Again, read-only.
Part 2 – ext4 Block Analysis
Now we have the filesystem mounted we can get going on the analysis. The question asks for the filename for block 1073741825. My first thought was the ext4 block. I have recovered deleted files from ext4 in the past by working from the inode via the block group, to the raw blocks on disk (Hal Pomeranz gave an excellent webcast covering exactly this scenario), maybe I can work backwards from the block number?
But that block number looks awfully large, especially for an 80GB disk. Let’s take another look at our saved fsstat output.
cat mwctf/fsstat-2048.out | grep -A 6 "CONTENT INFORMATION"

The question asks about block number 1,073,741,825 but the filesystem only contains 20,446,976 blocks. Okay, so we are not looking for an ext4 block. But, this is a Hadoop cluster. How does Hadoop store data?
Part 3 – Investigating Hadoop
The best resource I found to get a quick overview of performing forensic analysis of Hadoop (rather than using Hadoop to perform analysis) was Kevvie Fowler’s helpfully titled Hadoop Forensics presentation from the 2016 SANS DFIR Summit. Armed with this and some Googling, I located the Hadoop installation and data in the following directory:
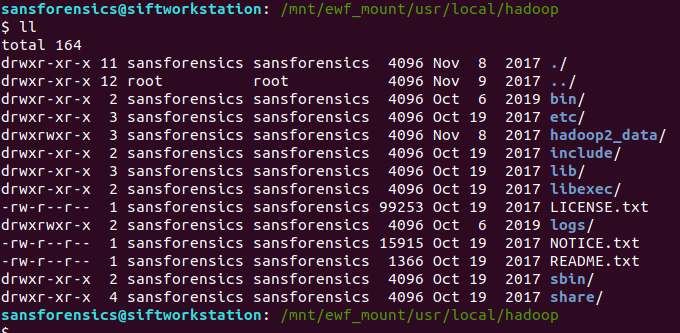
/mnt/ewf_mount/usr/local/hadoop
I was looking for the namenode location, which hold the fsimage files, which in turn, hold the metadata we are looking for. I found this by examining the hdfs-site.xml configuration file:
cat /mnt/ewf_mount/usr/local/hadoop/etc/hadoop/hdfs-site.xml
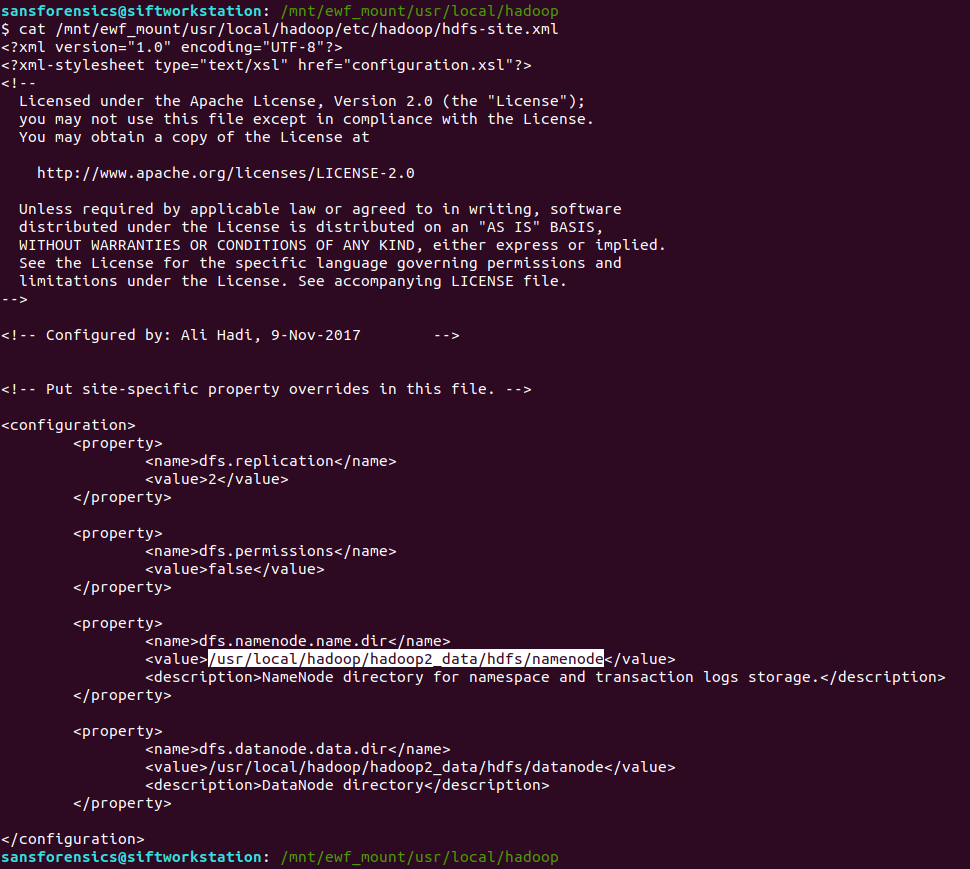
Looking under the namenode directory we find the fsimage files. The edits_ files can be thought of as being like transaction logs; best-practice would be to merge these before doing the analysis but for our needs this wasn’t necessary.
ll /mnt/ewf_mount/usr/local/hadoop/hadoop2_data/hdfs/namenode/current

Now that we have found the fsimage files, we need to get intelligible data out of them. Hadoop makes heavy use of a utility named hdfs. Among the many functions hdfs provides is the Offline Image Viewer (oiv) which can be used to parse the fsimage files and output something human-readable . That sounds exactly what we are after, the next problem is how to run it!
I don’t have Hadoop on my SIFT VM and installing it looks a bit fiddly, but we have a disk image from a (presumably) working Hadoop installation so maybe we can use that instead?
ll /mnt/ewf_mount/usr/local/hadoop/bin/
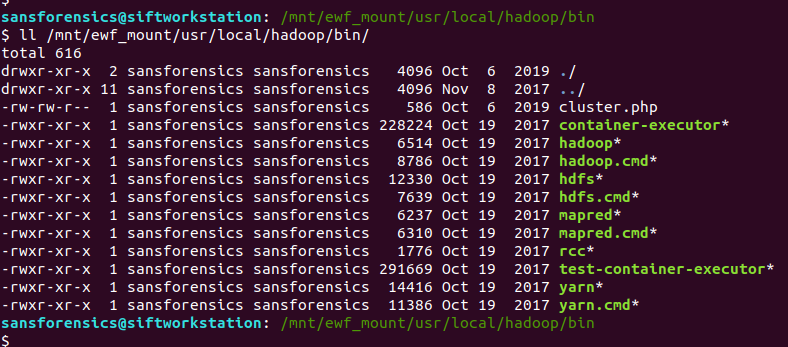
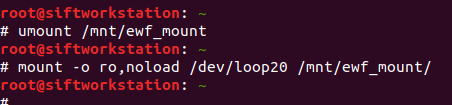
This is where things get a bit hacky. I mounted the filesystem using the noexec option as a protection against accidentally executing scripts and binaries from the disk image, but now that’s exactly what I want to do, so I unmounted and remounted the filesystem to allow this.
# umount /mnt/ewf_mount
# mount -o ro,noload /dev/loop20 /mnt/ewf_mount/
However, the Offline Image Viewer (hdfs oiv) throws an error because the Java path is incorrect.
/mnt/ewf_mount/usr/local/hadoop/bin/hdfs oiv -h

The Offline Image Viewer is looking for Java under /usr/local/ instead of /mnt/ewf_mount/usr/local/ taking the mounted disk image into account. I tried inspecting the script and exporting a new $JAVA_HOME environment variable, but it seems the Offline Image Viewer is taking the variable from a file, and as we are working on a read-only filesystem, we can’t easily change that. So instead of fighting to get the Offline Image Viewer to recognise an updated path, I simply copied the Java installation from the image to my native /usr/local directory and tried again.
sudo cp -r /mnt/ewf_mount/usr/local/jdk1.8.0_151 /usr/local
/mnt/ewf_mount/usr/local/hadoop/bin/hdfs oiv -h

Better! We have an exception because hdfs cannot write to its log file on a read-only filesystem, but the Offline Image Viewer runs! Let’s see if it can extract anything from the imagefs files we identified earlier.
/mnt/ewf_mount/usr/local/hadoop/bin/hdfs oiv -i /mnt/ewf_mount/usr/local/hadoop/hadoop2_data/hdfs/namenode/current/fsimage_0000000000000000024 -o /home/sansforensics/mwctf/fsimage_24.xml -p XML

We have the same exception because of the read-only filesystem, but…
cat /home/sansforensics/mwctf/fsimage_24.xml

… we have an XML file! After making the XML look pretty and searching for the block number, we find our answer in the name tag.

Week 5 done!
Flag
AptSource
